Einleitung

Das Plastikteil oben am iPod

  1. vNNW5HEbOIm6FvDI
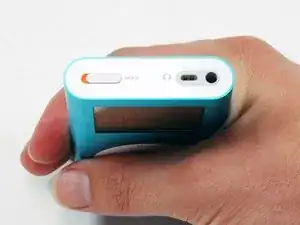
    • Bevor du den iPod öffnest, vergewissere dich, dass der Hold Schalter (Tastensperre) in der verriegelten Position ist.

  2. ZXkcuyTsDJVZLZru
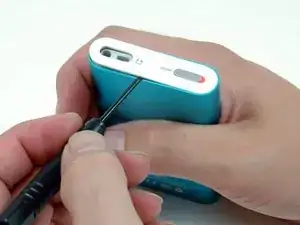
    • Setze vorsichtig einen kleinen Schlitzschraubendreher oder einen Jimmy zwischen das Metallgehäuse und die obere weiße Plastikabdeckung. Heble die obere weiße Plastikabdeckung mit den Schraubendreher ab. Passe darauf auf, dass du das weiche Plastik nicht mit dem Schraubendreher beschädigst.

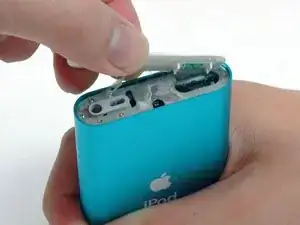
    • Die obere Blende ist mit Kleber befestigt. Versuche an verschiedenen Stellen anzusetzen, um das Teil zu lösen

    • Um das Lösen einfacher zu machen, kannst du mit einem Fön die Blender ein paar Sekunden lang leicht erwärmen.

    You can also gently use a metal spudger to lift up both the top and bottom bezels. Allow only 1/8" of the metal spudger (like the screwdriver in the picture) to get inside to get leverage, before fully lifting the bezel up. Please note where the little "teeth" are underneath the bezels, or you can damage those if you are not careful.

    Also, using too big of a flathead screwdriver can cause damage to the plastic and chips away plastic from where you were trying to pry up the bezels, ruining the look of the iPod.

    Ryan -

    There should be a button here for "I did it -- EPIC FAILURE!!" When I put my iPod back together, the components on the mainboard were scraping against the clickwheel, and maybe the battery wasn't in perfect alignment, but the result was that there was a lethal amount of friction when sliding the assembly back into the case. As I was trying to relieve the pressure by tilting the board down using a spudger from the bottom, the top of the display bezel ended up scraping against the casing in such a way that it cracked from the center of the right edge. OUCH!! There goes a $50 repair job and a $40 replacement cost! Bye Bye perfectly working iPod Mini )-;

    There are two safeguards that can be done when reassembling this iPod. First, use a stiff piece of plastic film as a shim and lubricant between the top of the logic board and the top inside of the case, such as anti-static packaging, or the clear bag packaging of Apple display dongles (use an exacto knife to cut a long strip of it). Don't cover the display with the plastic, just the logic board components. Second, instead of pushing down on the assembly from the top or sides of the display which will place dangerous pressure on it, connect a cable to the dock connector and pull on it from the bottom, and pull out the plastic shield deftly and easily after the assembly is in position.

    steadfast I and I -

    If it's held on by adhesive, how do I get it back on?

    Cam -

    If you have longish fingernails and don't mind ruining them, I found it helpful to run my thumbnail between the plastic and the metal casing before going at it with a screwdriver. The little "teeth" a previous commenter mentioned are at approximately the 1/3 and 2/3 marks on the long edge of the plastic casings.

    rongshifen -

    Instead of gouging the end caps out with the flat screwdriver, try hot gluing a piece of wood (I used a tongue depressor-like ‘craft stick’) to the end cap, then just lever the cap out without damaging the aluminum. Removing the stick and the glue from the end caps takes a little patience but can be done without leaving a mark.

    Human -

    Don’t use any kind of metal tool to get these plastic caps off. Metal on metal will scratch up the body. I use a thin guitar pick, work it in between the cap and case, then turn it horizontal and slide around enough until you can use your fingernail to pull the cap the rest of the way off. Don’t be aggressive and break off the little fingers on the bottom side of the cap.

    Ken Mastri -

    Use plastic picks or the back of an iSesamo tool to get in.

    TheYootz Media Group -

  3. mTMHBGo2Bswvagrd
    • Hebe die obere Blende vom iPod ab.

    A thinner blade, such as a small pocket knife blade worked for me.

    dean dillon -

Abschluss

Um das Gerät wieder zusammenzubauen, folge den Schritten in der umgekehrten Reihenfolge.

iRobot

Mitglied seit: 25/09/09

0 Reputation

0 Kommentare