Einleitung

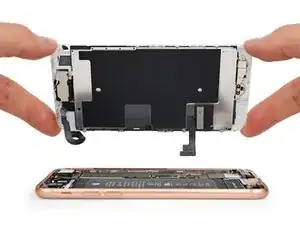
In dieser Anleitung wird gezeigt, wie du das defekte Display deines iPhone 8 reparieren kannst. Dieses Ersatzteil ist schon mit der Frontkamera, dem Ohrhörer-Lautsprecher und der LCD-Abschirmung ausgestattet, dadurch vereinfacht sich die Reparatur.

Du musst nur noch das alte Display ausbauen und den Home Button auf das Ersatzteil übertragen, damit Touch-ID weiterhin funktioniert.

Hinweis: Wenn die automatische Helligkeitseinstellung des iPhones nach der Reparatur des Displays nicht mehr richtig funktioniert, dann musst du auf iOS 12 updaten. True Tone funktioniert nach einem Displaytausch nicht mehr, selbst wenn ein originales Display von Apple verwendet wird.

  1. kH33mVcxVN2MyNsd
    • Bevor du anfängst, sollte der Akku deines iPhones auf weniger als 25% entladen sein. Ein geladener Lithium-Ionen Akku kann Feuer fangen und/oder explodieren, wenn er beschädigt wird.

    • Schalte dein iPhone aus, bevor du daran arbeitest.

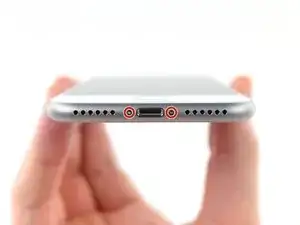
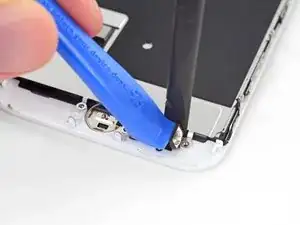
    • Drehe die beiden 3,5 mm Pentalobe Schrauben an der unteren Kante heraus.

    • Wenn du das iPhone öffnest, werden die Dichtungen beschädigt. Halte deshalb Ersatzdichtungen bereit, bevor du weitermachst, oder achte beim Wiederzusammenbau penibel darauf, dass keine Flüssigkeit eindringen kann, wenn du keine neuen Dichtungen verwenden möchtest.

    just how long are those screws- i turn and turn and turn and the lift off is soooo slight, seemingly insignificant…

    An. Jahnke -

    I would recommend, from the very beginning, dumping all tools out of the kit (if you got it) and using that white paper tool box as a tray to organize the screws and braces in. It’s nice to work over because it catches screws well and makes it easy to see them if you drop any.

    Johnny Emrica -

    That’s a great idea thank you

    Mohamed Dekkiche -

  2. VZtFUbiTGlxKvKuS
    VZtFUbiTGlxKvKuS
    nEk1gF4aPAU5BRUh
    jIumJl2vN3XDIiSv
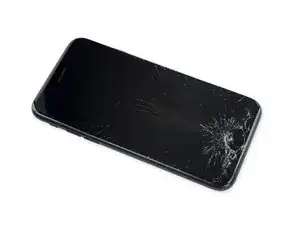
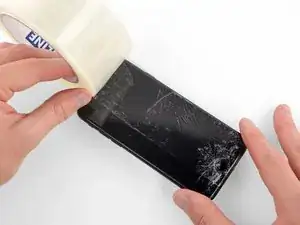
    • Wenn dein Display-Glas zerbrochen ist, dann solltest du weiteren Bruch verhindern und Verletzungen während der Reparatur vermeiden, indem du das Glas mit Klebeband abklebst.

    • Klebe durchsichtiges Klebeband in überlappenden Streifen über das Display des iPhones, bis die ganze Oberseite bedeckt ist.

    • Dieses Verfahren hält Glasscherben fest und sorgt dafür, dass die Struktur erhalten bleibt, wenn du am Display hebelst und es hochhebst.

    • Ziehe eine Schutzbrille auf, um deine Augen vor Glassplittern zu schützen, die bei der Reparatur herausspringen können.

    • Wenn das Glas so zerbrochen ist, dass ein Saugnapf bei den nächsten Schritten zu schwierig anzusetzen ist, dann solltest du versuchen, ein Stück sehr starken Klebebands (etwa Panzer-Tape) zu einem handlichen Griff zusammenzukleben und damit das Display anzuheben.

    In case of broken glass you can make the suction cup much more effective by covering the glass with a broad piece of translucent tape which eliminate air leakage through cracks in the glass.

    lionno1 -

    Il n’est pas nécessaire de mettre beaucoup de scotch.

    Au contraire plus vous mettez de scotch, plus il y aura de défauts et la ventouse ne collera pas.

    Une bande bien positionnée suffit.

    Chloé Bossuette -

    I’ve used hot glue on low setting to remove all types of crystals. The hot glue will release with a little iso alcohol. No damage to glass or plastic faced crystals or screens. Use a narrow piece of wood as a prying handle.

    Emilio Gonzalez -

    I recently had issues with removing the glass with the suction cup. I have done this many times with older generation iPhones but this time the glass seemed sealed on quite solidly. I told myself that the last option would be to use the screwdriver tip. After all my attempts, I transitioned to the option of using the screwdriver tip. Surprisingly, it was the easiest thing ever. I placed the 1mm flathead screwdriver at the interface between the glass and the cover (normal start location) and pried up very gently. Voila, the glass came up and I can’t even notice any dents or scratches. It felt much easier than the suction cup technique. If the suction cup is giving you a hard time consider using that 1mm flathead.

    forhereyesonly -

    This is definetly the best option to open this thing up. I’ve spend 30min with trying to heat it up and remove it using the suction cup. I needed 3sec with the 1mm flat screwdriver and i t was’nt scary at all. No dents nor scratches here too. Thanks for your comment.

    Berggorilla -

    thank you!!!!!

    Adrian Phan -

    Great suggestion to use the screwdriver!! Thanks, it really helped

    obo12759 -

  3. HWFBtehBMjCQcFAc
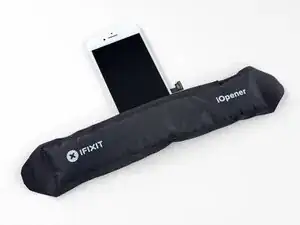
    • Es ist leichter das iPhone zu öffnen, wenn du das untere Ende erwärmst, so werden die Verklebungen aufgeweicht.

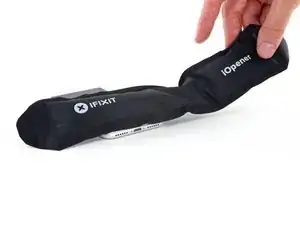
    • Du kannst das untere Ende des iPhones mit einem Haartrockner oder einem iOpener etwa 90 Sekunden lang erwärmen, dann sollte der Kleber weich genug sein.

    No hair dryer so GENTLY heated over stove burner

    John Toth -

    Hello,

    What temperature is suitable for removing the front display ? I bought i-Fixit ProTech which is not include the heating "roller" . Thanks for help

    Jiří Sítko -

    Ich habe eine heiße Wärmflasche verwendet. Das hat gut funktioniert :-)

    Moritz Hartges -

    I laid my phone face-down on my 3D printer’s heated bed, and set the temperature to 60 C. After a few minutes, it was ready to loosen.

    Nate B -

  4. VRy3fVrOovwUCabE
    VRy3fVrOovwUCabE
    A5IlSaM3n1xvayKW
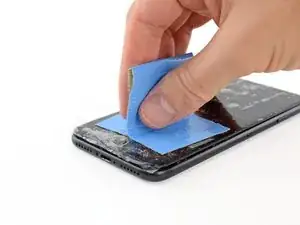
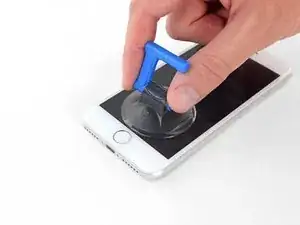
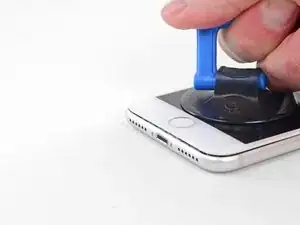
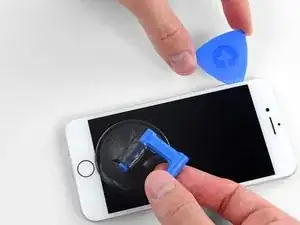
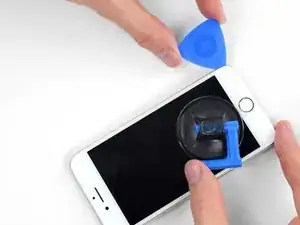
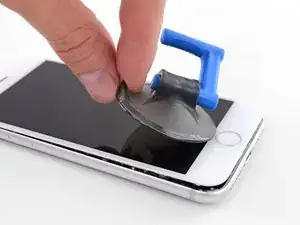
    • Setze einen Saugnapf auf die untere Hälfte der Vorderseite , direkt über den Home Button.

    • Passe dabei auf, dass der Saugnapf den Home Button nicht bedeckt, sonst kann der nicht mehr dicht abschließen.

    • Wenn dein Display stark gesplittert ist, dann haftet der Saugheber vielleicht besser, wenn du die Scheibe mit durchsichtigem Paketband abdeckst. Du kannst anstelle des Saughebers auch sehr kräftiges Klebeband benutzen. Wenn das alles nicht hilft, dann klebe den Saugheber mit Sekundenkleber an der zerbrochenen Scheibe fest.

    Even with using high heat from a blow dryer, I had to put the suction cup over the home button or the bottom edge wouldn’t lift at all. That waterproof adhesive is incredibly strong.

    Aaron Soderholm -

    As others have said, this part really stinks, but it’ll work if you keep trying. Agree with multiple rounds of hair dryer on high (did about 60-90s each time), and with having to out the suction cup over the home button. You don’t need a big gap to pry it open - it’ll be slight …

    Johnny Emrica -

  5. PnYJMHrBqA2Jh22u
    PnYJMHrBqA2Jh22u
    5BxGfRPfmCqCLMOc
    xYlJ5IgLFMxCDZ2B
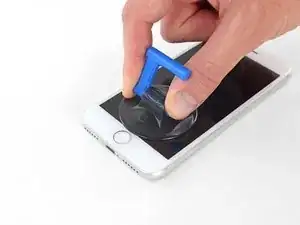
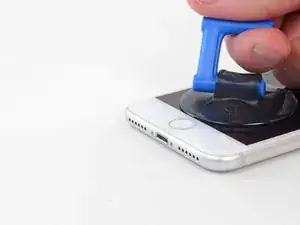
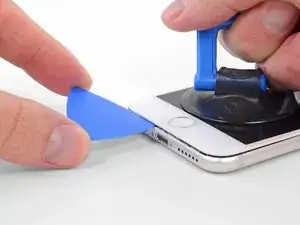
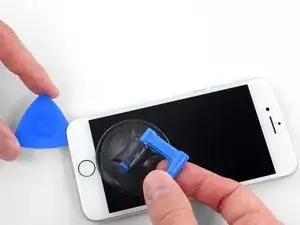
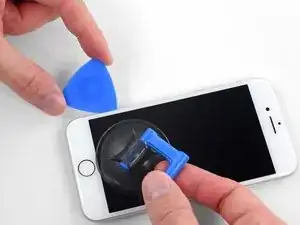
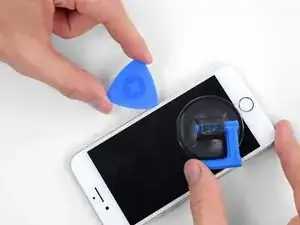
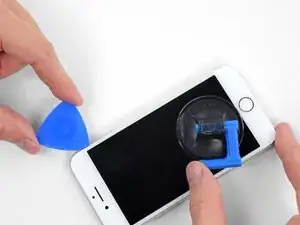
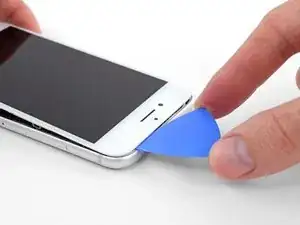
    • Ziehe gleichmäßig und fest am Saugnapf. Es sollte sich ein kleiner Spalt zwischen Front Panel und Rückgehäuse bilden.

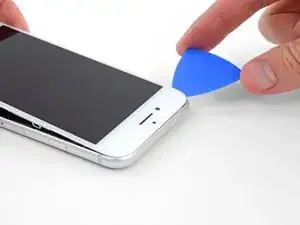
    • Setze ein Plektrum in den Spalt ein.

    • Die wasserdichte Verklebung am Display ist sehr stark. Um den Spalt zu öffnen, musst du recht viel Kraft aufbringen. Wenn du Schwierigkeiten hast, solltest du nochmals Wärme anwenden und dann die Scheibe vorsichtig hoch und runter ruckeln, um so die Klebeverbindung zu schwächen, bis du genug Platz hast, um dein Werkzeug einzuführen.

    The screen on my phone was so broken, a suction cup did not work, so I softened the adhesive with a blow dryer and used a Jimmy to carefully pry open the phone from the bottom just enough to slip a pick in.

    charguy -

    Just completed a smashed screen replacement, this is probably the most time consuming part. Used packing tape to cover the screen to help create a suction surface (had to replace it a couple times because it pulls away after a purple good pulls ) Used consistent heat for about 5 minutes, then stuck a pick in the tiniest opening… and pry pry pry!

    Brian Gill -

    I failed at this step. No amount of heating, pulling, and rocking opened up enough of a gap to slip in even a knife let alone the blue plastic tool. That's with a phone that has an undamaged screen - just trying to replace the battery. Apple won this round :(

    Michael Sherman -

    Be really careful here. I placed a sucker to the front and rear to help lever off the screen. However, the whole thing came away much easier than I anticipated and I ripped the front part completely away from the rear, tearing all three connector cables. New iPhone required.

    Chris Wood -

    Note that the opening pick they show here does not appear to come with the kit, which is a bummer! The plunger, the mini blue crowbar thing, these are too thick. I ended up using a really thin guitar pick.

    Johnny Emrica -

    Following careful methods can mostly preserve the seal and reusable. Won’t be as water tight but probably still pretty good.

    Bottom edge is pull up with suction + separating tool. Use small precision scissor to cut any tape that gets overly stretched upon initial opening.

    - For the 2 long edges, use an exacto knife to separate the seal from the screen. This keeps the tape on the chassis. Go slow along the long sides. Becareful to avoid scratching the paint on underside of the screen’s edge.
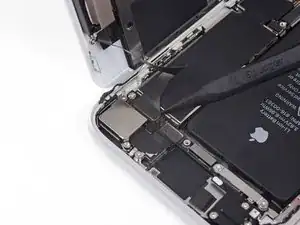
    - Top corners have a thick sealed tape. Best to just use separating tool to twist it open.
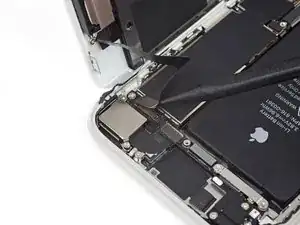
    In summary, top and bottom edge use separating tool. Side long edges can use exacto knife to gradually gently separate the seal from underside of the screen’s edge.

    Howard -
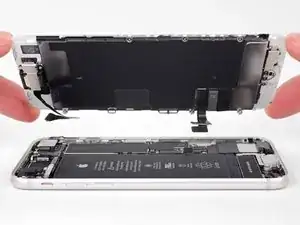
    4 picks and an exacto knife, plus 45 minutes later, I finally got it to open! Thanks tor the tip!

    Cat -

    Intact screen, check. Tool kit, check. Hair dryer hot enough to make the phone too hot to touch, check. Following all instructions, check. Screen still in place and refusing to come off, check.

    I heated, reheated, pulled and pulled. I simply could not get it off. Worked at it for an hour and a half, and I’m not a small guy. Yes it is hard to hold, but could get a grip. Just could not get it to budge. Off to the iPhone repair shop tomorrow. Anybody want to buy a repair kit and replacement battery?

    Jim Meyers -

    After struggling for 30m, I looked up some alternate methods and found this helpful:

    https://www.youtube.com/watch?v=25zAK5mG...

    - I used a utility knife and pried up right under the home button

    - the angle matters! I was trying to go too far down before going in. The top surface of the phone is rather thin, so you go in after barely getting under the chassis lip

    - tilt utility knife left to right once you’ve got it under to work it in

    - leave the utility knife in, and now add that pick

    Jared Wilk -

    Pro-tip: don't be an idiot like me. Instead, remove the screen protector you have on the phone before applying the suction cups. Derp.

    hunter.geofizz -

  6. 2QPL6xQ1bKKTHEE2
    2QPL6xQ1bKKTHEE2
    Scr2EQgs2BWhSj3N
    KyO5DVLoiSXnDh2Z
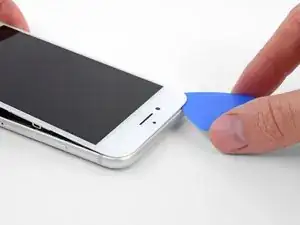
    • Schiebe das Plektrum entlang der linken Kante von der unteren Ecke an nach oben in Richtung der Tasten für die Lautstärkeregelung und des Stummschalters. Trenne so die Klebeverbindung des Displays auf.

    • Halte vor der oberen linken Ecke an.

    • Versuche nicht, die Oberkante des Displays vom Rückgehäuse wegzuhebeln, denn hier halten Plastikclips die Teile zusammen. Die Clips könnten abbrechen.

    My Plektrum worked ok, but the edges broke off a bit towards the end

    griffin.weber -

  7. bYHHQWBLX2SbZ4ZM
    bYHHQWBLX2SbZ4ZM
    oWPIhKQUMFLQKwJF
    VbhlSMqUKVaR3i4t
    • Setze das Plektrum an der rechten unteren Ecke ein. Schiebe es um die Ecke herum, dann entlang der rechten Kante nach oben. Trenne dadurch die Verklebung.

    • Setze das Plektrum nicht zu tief ein, du könntest auf dieser Seite diverse Displaykabel beschädigen. Schiebe es nur wenige Millimeter tief ein, ungefähr in der Breite des Displayrahmens.

  8. JsELGeLj2sULj4Rl
    JsELGeLj2sULj4Rl
    1Q5TB6TXChTQrCSO
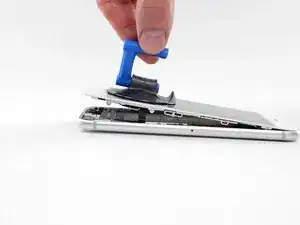
    • Hebe vorsichtig den Saugnapf an und mit ihm den unteren Teil des Displays.

    • Hebe das Display maximal 15° an. Du könntest sonst die Flachbandkabel des Displays überdehnen und beschädigen.

    • Ziehe an der kleinen Lasche am Saugnapf, um ihn vom Front Panel zu lösen.

  9. 1wx6fuMwGlVmTVwg
    1wx6fuMwGlVmTVwg
    L5DvjVj5xMJAlXg4
    y6nMrARZIGjH4KZO
    • Schiebe das Plektrum unter das Display um die obere linke Ecke und die Oberkante entlang, um die letzte Klebeverbindung zu trennen.

    I did end up using just a smidge of IFIXIT adhesive remover along the edge before opening and that seemed to really help

    Karen Flowers -

  10. pmOBsioPu6PHdocL
    pmOBsioPu6PHdocL
    wCWsnncFGO1Jy1KT
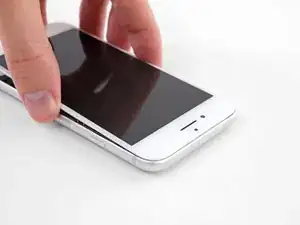
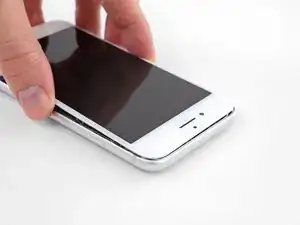
    • Schiebe die Displayeinheit leicht nach unten, weg von der Oberkante, um die Clips zu lösen, mit denen sie am Rückgehäuse gehalten wird.

  11. XaJPKiESSbHGIDqx
    XaJPKiESSbHGIDqx
    TKsLuMfvlLBnsdMa
    uyGD4MIvBrhLyuiO
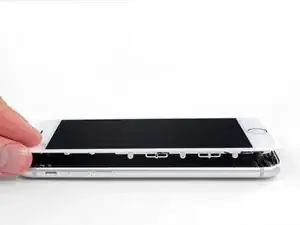
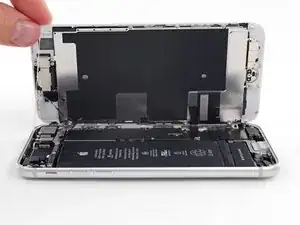
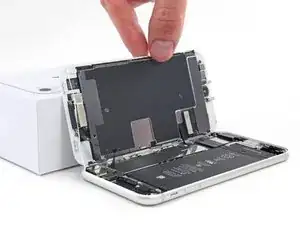
    • Öffne das iPhone, indem du das Display nach links klappst, so wie man die Seite eines Buches umschlägt.

    • Versuche noch nicht, das Display ganz zu trennen. Verschiedene empfindliche Flachbandkabel verbinden es noch mit dem Logic Board.

    • Lehne das Display an einen geeigneten Gegenstand, um es gut zu stützen, während du weiter am iPhone arbeitest.

    Nach RECHTS klappen - nicht nach links!

    Manfred Wachtel -

    Als ich das Flachbandkabel auf der rechten Seite sah, hab ich mich auch gefragt, ob die das mit nach Links klappen ernst meinen, und das „Buch“ lieber auf japanische Art nach rechts aufgeklappt. Das sollte dringend in der Anleitung korrigiert werden!

    Sebastian Plickert -

    “Up from the left” means lift up the left side.

    Which is the same as folding to the right.

    “Like the back cover of a book” explains it even more clearly.

    Maybe it gets lost in translation?

    Nick Shtangey -

    Fold to THE RIGHT - not to the left!

    Jim Glenys -

    When I saw the ribbon cable on the right side, I also wondered if they were serious about folding it to the left, and the "book" would rather be opened to the right in the Japanese way.This should be corrected urgently in the manual!

    Jim Glenys -

    Hi Jim, the display opens from the left side, toward the right side. It should look like the back cover of a book. Hope this helps. Good luck with the repair!

    Adam O'Camb -

  12. X4JWAcg6GhHQOSP3
    X4JWAcg6GhHQOSP3
    CnISuIWAepn3nMmI
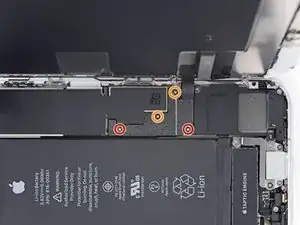
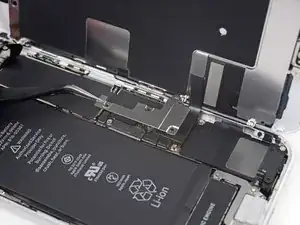
    • Entferne vier Kreuzschlitzschrauben, mit denen die Halterung des unteren Displaykabels am Logic Board befestigt sind. Sie haben folgende Längen:

    • Zwei 1,3 mm Schrauben.

    • Zwei 2,8 mm Schrauben.

    • Halte deine Schrauben während der ganzen Reparatur wohlgeordnet. Jede Schraube muss beim Zusammenbau wieder an ihren alten Ort zurück. Eine falsche Schraube am falschen Ort kann dauerhafte Schäden verursachen.

    • Entferne die Halterung.

    Not Y000 this time haha

    Easy Repair -

    can same length screws mixed up?

    Brook布魯克 -

    It is not ideal, but possible for these screws.

    Arthur Shi -

    using the repair kit i purchased with my screen replacement, i am currently having issues removing these screws with the PH000. please help

    Mark Ordaz -

    I was too, thankfully I had another set that contained the PH00 bit, that worked great for me.

    William Mitchell -

    Ok. My screw is stuck. How do I remove it? Philips head is stripped.

    Kristina Graham -

    Solved it myself. Firm pressure did the trick.

    Kristina Graham -

    Takes a little pressure with the Philips head

    John Toth -

    Upon this step, I noticed I had no bracket or screws. I had my screen replaced previously and I’m disappointed to find out the repairperson made no effort to replace these parts. I’ll start trusting myself more to do my own repairs.

    O D -

    took me awhile to figure out I needed to use PHOO bit for the 2 -1.3 screws

    Karen Flowers -

  13. vdubYBYlNkIsKuhK
    vdubYBYlNkIsKuhK
    asfJCUmeGVaHpBuD
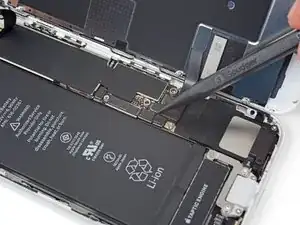
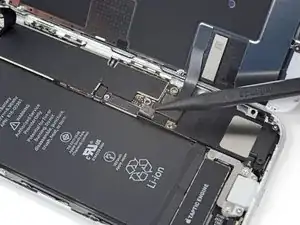
    • Heble den Akkuanschluss mit der Spudgerspitze aus seinem Sockel auf dem Logic Board.

    • Biege das Akku Anschlusskabel etwas weg vom Logic Board, um zu verhindern, dass es sich versehentlich wieder mit dem Akku verbindet und das iPhone während der Reparatur unter Spannung setzt.

    Make sure you pry the battery connector off from the right hand side as shown in the picture. Theres a delicate component on the logicboard near the battery connector called a Mosfet which is linked to the battery charging software. If you knock it off accidently you’ll loose battery charging and the phone will boot loop and youll need to have it re-soldered back on.

    Gareth -

    So this is it. You don’t have to go any further removing the screen. You can replace the battery right from this point.

    John M -

    I wish I saw this comment 2 hours ago

    Kenneth Moore -

    This is where I broke my phone, a phone that was working quite well, paid for in full. Just because I had a cracked screen. Be super careful when connecting the cables. I was in a hurry and not paying attention, used too much force when re-connecting and broke those teeny little pins that could not be repaired. A tech tried for an hour to no avail. cautionary tale. Good luck

    Karen Flowers -

  14. TCwUjpw4oswOSAXN
    TCwUjpw4oswOSAXN
    Vjj4xROqJwdhjhrT
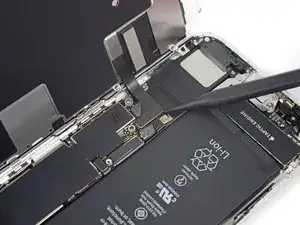
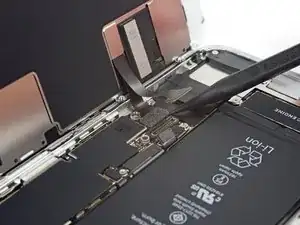
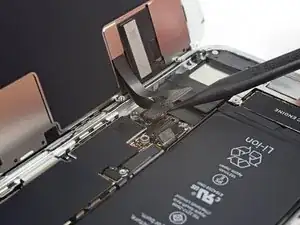
    • Heble den unteren Displaystecker mit der Spudgerspitze aus seinem Sockel.

    • Um Druckverbinder wie diesen wieder anzuschließen, musst du erst auf einer Seite herunterdrücken, dann auf der anderen. Drücke nicht in der Mitte. Wenn der Verbinder auch nur ein bisschen daneben sitzt, kann er sich verbiegen und irreparabel beschädigt werden.

  15. nuu4q5qZrNVlF1n2
    nuu4q5qZrNVlF1n2
    ZeGwj4XhWqCFSoRa
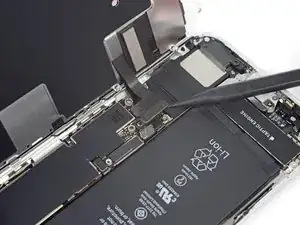
    • Löse den Verbinder am zweiten unteren Displaykabel mit der Spudgerspitze.

  16. hGBZSQdwlg53JjuO
    hGBZSQdwlg53JjuO
    EiOkLa1UAXIrQF1o
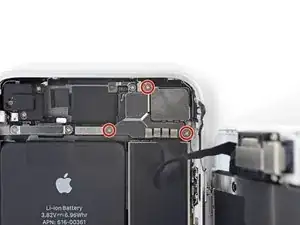
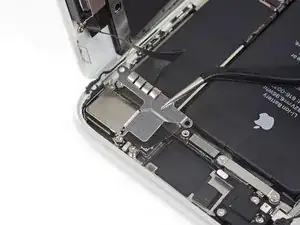
    • Entferne die drei 1,3 mm Kreuzschlitzschrauben, mit denen die Halterung über dem Verbinder der Front Panel Sensoreinheit befestigt ist.

    • Entferne die Halterung.

    If you are replacing the adhesive liner, the remaining release liner strips will interfere with the two outer screws. I had to cut a working section out of the liner at each location and move it aside with the spudger.

    Thomas Tritt -

    This part is throwing me for a loop. Having difficulty finding the read head for these screws. Is it the same size as the two small 1.3mm screws in step 12?

    Jared Hensley -

    ended up getting it with the PH000, I must of just been rushing it.

    Jared Hensley -

    My bracket looks different and none of the screw heads I have fits.

    Ray Rushing -

    Mine too? Any help?

    George Waller -

    These screws did not stick to the magnetic screwdriver. Extremely difficult to get them back in place - but with some patience i succeeded :)

    Niklas Brammer -

  17. 1qYKeCSMYWRsFEnh
    1qYKeCSMYWRsFEnh
    tDDsCXEve1a6jSr3
    • Löse den Verbinder der Front Panel Sensoreinheit mit der Spudgerspitze.

  18. VcZIwswUILoZYWbE

    Hi ifixit, if you find my method dangerous, please remove it.

    After Step 17, I skipped Step 18 to Step 28.

    At Step 29, I lifted up the four adhesive black pull-tabs to expose the white adhesive side. Next, I use hot air gun and blow on the back cover of the iphone for about a minute (maybe a hairdryer will work too) .

    Warning: Don't overheat the iPhone, or you may accidentally ignite the battery.

    I think the temperature was around 60 DegC.

    Extreme Caution: Do Not overheat. I use my hand to gauge the hotness. Careful not to burn yourself or the board.

    I was able to pull out all the white adhesive tapes easily as the adhesive soften.

    DO NOT TRY this method if you are a novice or inexperience! I am not responsible if you hurt yourself or damage your iphone!

    John -

    Hey John! I’m glad the repair worked out for you!

    From our research, applying heat does soften the adhesive strips, but it also causes them to lose structural integrity and break more easily. That’s why we normally suggest using heat after the strips are already broken. Removing the Taptic Engine definitely takes a few extra steps, but we feel that it gives fixers the best chance of pulling out the adhesive strips intact.

    Arthur Shi -

    I agree with John, skip 18 through 27. These are to make it easier to remove the battery adhesive. I replaced the batteries on two IPhone 8s. The first one I did all that stuff and the adhesive still broken and I had to carefully pry the battery out anyway. When I reassembled the phone the Home button no longer worked. Looking it up, this is apparently fairly common due to all the fragile wires involved in these steps. The second I skipped these steps and when I reassembled it everything worked fine. Not one of the eight (both phones) adhesive strips came out properly. I fully drained the batteries before doing the repairs. By the way, I use the virtual home button on the one phone, it’s a little annoying, but the phone is still usable if you’re not ready to shell out for a new phone.

    Gary Berman -

    I also skipped these steps. I won’t say it was entirely successful - two of the four adhesive strips broke and could not be grabbed with tweezers. But I had gotten most of the adhesive out already and the battery was quite loose, so I used a warmer under the phone, then gently slid a flat plastic blade under one end of the battery and slowly worked it up the phone. (Dental floss would have been safer-don’t do what I did, kids!)

    Matt D -

    Likely can skip step 18-28 and all the risks. Battery tape is relatively removable by the following method

    - use a tweezer to pull up a corner of each tape. Then use fingers to peel back all the black tab on top of battery

    - use 2 hands. Index and thumb on both. Pull about 1/4” with one hand, hold the tension and pull 1/4” with the other hand. Alternate, go slow. Pull out all 4 tape completely. I think the pause after each 1/4” while holding the stretched tape firmly prevents the tape from over stretching to become too thin and break.

    - Don’t apply heat, I would guess that makes tape softer and break easier.

    Have tried other methods and failed in the past. Pulling too fast (tape will snap) or use a tweezer to twist/roll (sharp edges will cut tape) Anyway, just use index/thumb on both hands and alternately pull slowly

    I did do 2 iPhone 8 battery change this way. One removed all tape without breaking. Another broken all 4 tape after about 1/3 pulled so likely some factory assembly differeces.

    Howard -

    I second this, this method works well in most cases. Removing the haptics helps to keep the angle low and pulling the tape as straight as possible

    Hein Blöd -

    Howards method for removing the adhesive works like a charm. The only addition I made was to slightly warm the back of the iphone on a rice pack (used for sore neck muscles—haha). Going back and forth between hands is really crucial. While on hand gives a gentle pull, the other holds the phone from moving. Slow back and forth. Thanks.

    Lynn Thomas -

  19. C3FyYiUfZDrATcGX
    C3FyYiUfZDrATcGX
    W6ZvW53leLeJoPxm
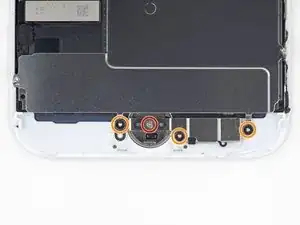
    • Entferne die vier Y000 Schrauben an der Halterung über dem Home/Touch ID Sensor:

    • Eine 1,2 mm Schraube

    • Drei 1,3 mm Schrauben

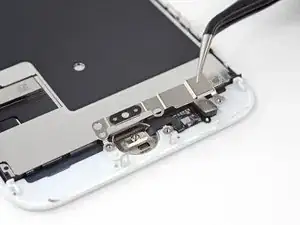
    • Entferne die Halterung.

    • Achte beim Wiederzusammenbau darauf, diese Schrauben nicht zu fest anzuziehen, sonst funktioniert dein Home Button unter Umständen nicht.

    Bei meinem iPhone waren das Y00 Schrauben, nicht Y000

    Andreas Veeser -

    If the screw on the home button is broken, you can bend the metal sides upwards and pull down out of the phone and push and refold into the new display. Example: https://www.youtube.com/watch?v=DTCQA-jn...

    Andy Knapp -

    Andy Knapp - wherever you are - you saved me. NOTE: the iphone 8 has four tri-wing screws - that means you need a tri-wing screwdriver. I ordered an entire replacement set and mine had one in there, but it does not mention anything about tri-wing in these instructions… so. Hope that helps someone.

    Paula Lofland -

    On my iPhone, these were Y00 screws, not Y000

    Jim Glenys -

    Dutch version speaks of one 1,3 mm screw, but has 3 of those screws.

    Fonne Van Gils -

  20. 5JRgEZR3QgUIKnIK
    5JRgEZR3QgUIKnIK
    WOm34TtFHCZDroBc
    Rtmt1jOfimOEWcIp
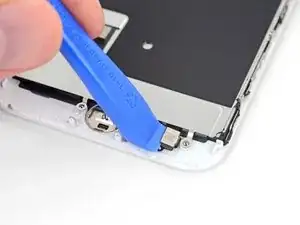
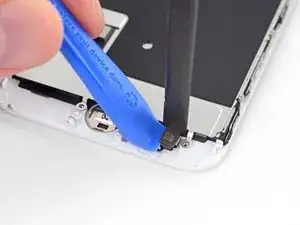
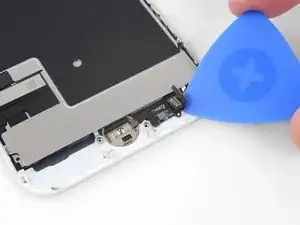
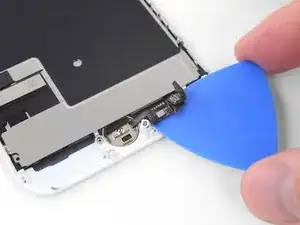
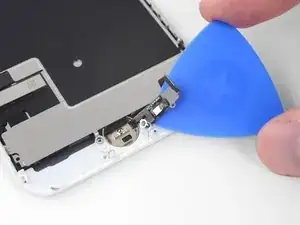
    • Setze das Plastiköffnungswerkzeug unter der linken Kante des Steckers vom Home Button Kabel an und heble ihn hoch.

    • Wenn der ganze Stecker nach oben klappt, ohne sich zu lösen, dann musst du das Kabel an der Oberkante des Steckers mit dem flachen Ende des Spudgers nach unten drücken und gleichzeitig an der linken Kante des Steckers nach oben hebeln. Pass auf, dass du dabei weder Kabel noch Stecker beschädigst, denn sonst könnte der Sensor ganz kaputt gehen.

    To have a better view on this connection I have removed the metal plate covering the back of the glass. Its a thin piece of metal held by 9 screws. To unscrew the 8 screws you need the screwdriver head with 3 sides like the Mercedes Benz symbole. The last is with a phillips near the camera.

    forhereyesonly -

    I thought I was going to tear the cable doing it the way it’s suggested in the guide. After examining the cable on the replacement screen, I found it easier to hold the bottom connector pressed against the screen with one leg of needle nose tweezers whilst gently prying off the top connector with an opening tool.

    Cool_Breeze -

    See step 22 to get a clearer picture of what the connector looks like when it is separated from its socket. Your replacement screen will have a new socket (i.e., the bottom piece of the connector). My replacement screen had a new socket attached to the unit by a thin piece of plastic. For reassembly, when working the Home Button/Touch ID assembly back into the new screen, I had to work the connector cable under the socket in order to get the connector re-attached.

    Kristina Graham -

    Be extra careful with this step: it wasn’t clear to me from the description that the connector wrapped from underneath to connect, nor did my set come with picks. I used a blade from the wrong side, inadvertently (but way too easily) severing the connector and destroying the function of the home button and thus the entire phone.

    Jennifer Indeliclae -

    Be careful, I initially didn’t found the connector and nearly ripped the cable. The connector leads to a cable that goes under the metal plate. Found a YouTube video with very good close ups for this part (go cell phone repair detailed version)

    Svenja Büsing -

    I initially didn’t found the connector and cable and nearly broke it. The connector leads to a cable that goes under the metal plate, I needed YouTube video with good close ups to understand the setup.

    Svenja Büsing -

  21. TIioXdAH3FA1YH5f
    • Das empfindliche Kabel des Sensors ist verklebt. Es ist hilfreich den Bereich rund um den Sensor zu erwärmen, um den Kleber aufzuweichen.

    • Drehe die Displayeinheit herum. Benutze einen Haartrockner oder erwärme einen iOpener, um die untere Kante des Displays für 90 Sekunden zu erwärmen. So wird der Kleber darunter weich.

    • Erhitze das Display nicht zu stark. Es sollte gerade so heiß sein, dass es unangenehm ist es anzufassen.

    The stove top works well also. Remember, as the main instructions say, it should be slightly too hot to touch comfortably.

    forhereyesonly -

  22. nnPsbhgZ3Ciy3MYd
    nnPsbhgZ3Ciy3MYd
    Exy4jdwBwNiRYVwl
    VCXYytuxIOIRZKMf
    • Trenne die Klebeverbindung des Home/Touch ID Sensorkabels mit einem Plektrum von der Rückseite des Displays.

    My original assembly broke trying to follow this step carefully. :(

    Ann -

    This one’s kind of hard to reconnect. Just remember to be gentle, take your time, and use your hands so that you can really feel it out.

    Johnny Emrica -

    Keep in mind, there’s a tiny rubber ring gasket between the Touch ID button and the display. In my experience when removing the button, the gasket stuck partly to the the button and partly to the display. I gently removed the part that was sticking to the display and guided it back on the button. If you’re missing that gasket it won’t be waterproof.

    Sam Tropper -

  23. VPPBP1NZRwGXKW5H
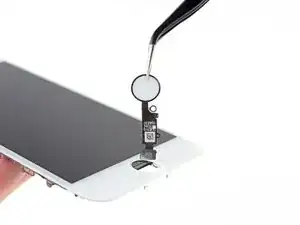
    • Entferne die Home/Touch ID Sensoreinheit, indem du sie durch die Vorderseite des Displays durchziehst.

    • Beim Zusammenbau musst du erst das Kabel durch das Loch in der Vorderseite des Displays fädeln, wie im Bild gezeigt.

    • Bei deinem Ersatzteil können zusätzliche Y000-Schrauben bereits enthalten sein, die in der Nähe des Home Buttons montiert sind. Entferne die unnötigen Schrauben, damit du die Halterung des Home Buttons wieder montieren kannst.

    Instructions were great. Putting the connections back is a bit of a hassle, but patience is your friend. Phone is up and running. Thanks iFixit.

    pwpfef01 -

    Couldn’t get the Home Button (original one I was transferring) to work. I know the instructions said something about not tightening down the 4 screws around the Home Button too much, but how much is too much. Also, a day later, the screen I bought starting having green vertical lines. Took everything back apart and started from scratch the next day and still had the same 2 problems. Just for the heck of it, I put the old cracked screen back on the phone and everything started working again. Figured I wasted about 6-8 hours total on this rather small project and I’m right back where I started again. Something definitely wrong with the screen I ordered and I’m very disappointed. I’ve bought products from ifixit before and they worked, but no such luck this time. Anyone know how I get my 70 bucks back?

    Todd Skobjak -

    Hi Todd!

    I’m sorry to hear about your experience! Please contact our customer support and we will get the issue resolved!

    Arthur Shi -

    I greatly support Ifixit… but.. for me the same story as Todd Skobjak. Put in the new screen. Touch button is not found. Retried with screws loosened and refitting the plug. Nothing. Put the old screen back and the touch button worked again. So.. something with the new provided screen from Ifixed must be the case. I'll also get in touch with customer support.

    Ifixed: not only check the screen but also the cable to the touch button!

    Ton Vaes -

    What’s the trick here?

    Getting an “unable to activate Touch ID” after replacing the home button and a new screen - somewhat similar to that above. Any troubleshooting steps/resolution? I loosened, tightened screws holding the assembly, no effect.

    schaferjon -

Abschluss

Um dein Gerät wieder zusammenbauen, folge den Schritten in umgekehrter Reihenfolge. Vergiss nicht, vorher das Display wieder festzukleben.

Entsorge deinen Elektromüll fachgerecht.

Die Reparatur verlief nicht wie geplant? Auf unserem Antwortenforum findest du Hilfe bei der Fehlersuche.

Oder wenn du auf der Suche nach einem neuen Gerät sind, überlege dir, vielleicht ein aufbereitetes

iPhone 8 von unseren Freunden bei Backmarket zu nehmen.

Adam O'Camb

Mitglied seit: 11/04/15

159624 Reputation

31 Kommentare

And do you just wing it for the front camera, proximity sensor etc ?

kyle -

This guide assumes you’re replacing the entire display assembly, with those parts included. If you bought a bare display then yes, you’ll have to transfer those additional components over, and that’s beyond the scope of this guide—although as mentioned in the introduction, we’re working on adding guides for those additional components as well.

Jeff Suovanen -

wait a second… Are you saying that when we change the screen it is also necessary to change the front camera?

Caio Antonius -

@eitantonius A lot of new screens come with a replacement front camera already installed. They cost a bit more, but make the job easier. You can save a few bucks if you buy a stripped-down display, but you’ll need to go through some additional steps to transfer the original front camera (and a few other components) from your broken screen to the new one.

Jeff Suovanen -

I cracked the camera glass (housing) on the back of the phone. Is it possible to replace without replacing the entire back of the phone/case?

Chris -

yes, but it is almost impossible. it involves removing the actual glass from the back housing, and the entire backside has a strong adhesive. Its recommended not to do that as it can result in either cutting yourself, or damaging the wireless charging coil thats found behind the glass.

RaggedMyth Gaming -

Is there any update on the ambient light sensor yet? Is it working with the new beta version of IOS12? I would be delighted to hear about it.

valentijnawc -

Auto Brightness works on all versions of iOS 12 that we’ve tried. True Tone does not. However, if you have your original display, there’s a fairly inexpensive (~$75 USD) device that can clone the data from the original display to the new one and restore True Tone. They’ve been around for a while and most repair shops should have one by now.

Jeff Suovanen -

any idea when the guide for full replacement will be available?

Cody Robinson -

Replaced screen a success now it is stuck on a boot loop….. help please.

kevin s love -

Boot loop can be caused by bad proximity sensor, which is moved to the new screen from the old. Or if you got one that came with it, it may be defective.

Idaho iRepair -

So, the original screen has these three tabs that slide in the recesses in the top of the phone case, all your pictures show only the aftermarket screens with two aluminum rectangulars (at the top of the screen). Isn’t that going to possibly cause the screen to pop out eventually (if the adhesive fails for say) since there is nothing physically holding it in place?

andyradchishin -

There are no aftermarket parts shown in this guide—that’s an original Apple display on a brand-new iPhone. You might be thinking of a different model? But to answer your question, yes, if the clips aren’t secured correctly then there’s a chance of the screen coming loose at the top.

Jeff Suovanen -

Will Touch ID work after the repair? That is my only concern about the repair.

Pietro Romanato -

As stated at the top, it will work fine provided you are careful to transfer the original home button to your new screen, without damaging it.

Jeff Suovanen -

Used the iFixit screen replacement parts and this guide. Guide was spot on and replacement screen weeks perfectly! Thanks for the guide!

Brian Gill -

Uno de los conectores a presión al parecer se me ensucio o doblo, por no hacer presión a los lados como aconsejan. que debo hacer

yeico_king_22 -

One of the pressure connectors seems to get dirty or dommed, for not pressing the sides as advised. I have to do

yeico_king_22 -

There should be an advisory to be careful when unscrewing the very first screws—mine stripped very quickly and easily. One failed attempt and getting that screw out is nearly impossible.

Zachary Veitch -

Hello, is the replacement camera the same quality as the original? And if not, would it be difficult to get this kit and swap my original camera over? Thank you.

Jakub Wheeler -

I did change my display but did not disconnect the battery while doing it. Now the microphone does not work anymore. Did I connect something wrong or did I damage the mic with the connected battery? (A different “how to video” of youtube does not disconnect the battery :( )

Philipp Ahrens -

My screen is cracked and chipping away in places. It is leaking black ink over most of the top left corner of the screen. Would this repair be able to fix that?

Greyson Haynes -

Hi Greyson,

Yes, this repair will make the screen new again! If this damage is due to a serious drop, you may need to fix some other things—the frame may be slightly warped, or other components may be damaged.

Arthur Shi -

This is inconclusive.

When replacing the display, you purchase (or part of your purchase) a “iPhone 8/SE 2020 Display Assembly Adhesive “ kit, but there are no instructions (even in the kit) on how to apply it.

Why is that?

Anyname -

Hello! The link on how to reapply the adhesive is actually in the conclusion section of this guide. Here is a quick link!

Arthur Shi -

Great instructions! Worked well for both disassembly and assembly. Thanks!

Zachary Schmidt -

Hi!

I successfully replaced my broken display with the replacement display from ifixit and most of the time it works well.

But since the repair it happens very often that the screen does not react anymore after the phone wakes up. I can unlock it via finger print, but it does not react on any touch. After hard reset, it runs again well till it freezes next time. Currently, it happens ~5 times per day, which is especially annoying, when I got a call and can’t take it…

What could be the reason for that?

Thanks!

Niels

nklan -

Hi Niels, it sounds like it could be a loose digitizer connection. Try opening the phone back up, disconnect the display, blow any debris out of the connectors, and carefully reconnect them. If that doesn’t work it could be a faulty display. In that case contact our support team for some help.

Adam O'Camb -

I need a piece of the screen from the front and the back the glass to both is broken Is it available or only the front ?

Ali -

Worked absolutely fine. Found though that I stripped the head on the first pentalobe screw (schoolboy error) I had to find a 0.3mm drill to drill it out and everything went fine thereafter.

matt -

I have party successfully replaced the screen, but I have two serious issues.

1: The battery does not charge after the unit have powered up, so it charge up to 4% then it turn on and stop charging, what errors can I have done to cause this.

2: My cellnetwork does not find any services, I am able to connect to Wi-Fi, but no cellular service, what errors can I have done to cause this?

Thanks for a great guide.

/Anders

margurithe -