Einleitung

In dieser allgemeinen Anleitung wird gezeigt, wie vorgestanzte Akku-Klebestreifen für Smartphones angebracht werden.

Wenn du stattdessen doppelseitiges Klebeband benutzt, dann nutze diese Anleitung als eine allgemeine Richtlinie, um zu wissen, wo der Klebestreifen angebracht werden muss.

  1. eGmSIiCXUCckruaF
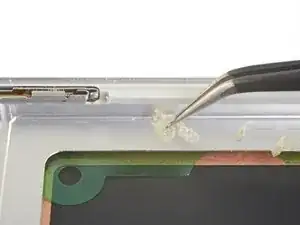
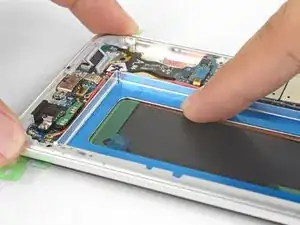
    • Entferne alle Klebereste vom Smartphone-Rahmen und reinige diese Bereiche mit Isopropylalkohol und einem fusselfreien Tuch.

  2. 1lqTPQxGMrURio3Y
    1lqTPQxGMrURio3Y
    nxYR2qEUVK2QC6q2
    5Wue4xwGiOTaVCx2
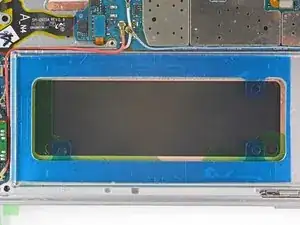
    • Bevor du anfängst, sieh dir genau an, in welcher Richtung und an welcher Stelle der vorgestanzte Klebestreifen eingesetzt werden soll.

    • Wenn der vorgestanzte Klebestreifen die Zuglasche am Rand zum inneren Ausschnitt hat, dann sollte er als erstes in die Vertiefung für den Akku eingeklebt werden.

    • Wenn der vorgestanzte Klebestreifen am äußeren Rand eine Lasche zum Abziehen hat, dann sollte er als erstes auf den Akku geklebt werden.

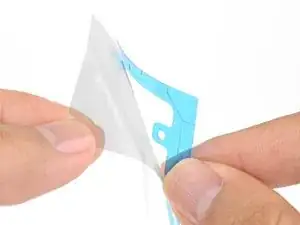
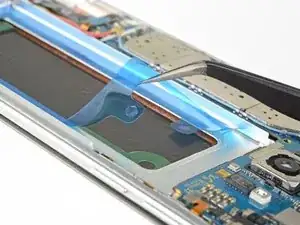
    • Ziehe die durchsichtige Plastik-Schutzfolie vom vorgestanzten Klebestreifen ab, um den Kleber freizulegen.

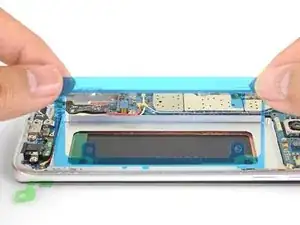
    • Richte eine lange Kante des Klebestreifen mit der Kante der Klebefläche aus.

    • Setze den Klebestreifen behutsam auf die Klebefläche.

    • Der Klebestreifen ist wirklich sehr klebrig; du hast nur eine Chance, ihn genau auszurichten.

    Test the battery before doing anything with adhesive. Also, the adhesive is entirely optional - it is NOT necessary for the phone to function well, as the battery is a tight enough fit not to wiggle any connectors loose.

    Miles Raymond -

    When I tried this, the adhesive stuck to the backing better than it did to the phone frame, and became tangled. I don’t see any way I could have prevented that.

    blicher -

  3. ImVBArDyKbWbMRmX
    ImVBArDyKbWbMRmX
    ruqweShUvoXVKW4f
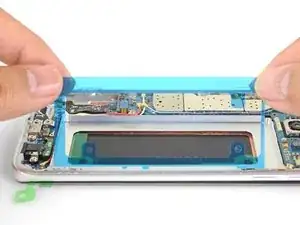
    • Wenn der Klebestreifen korrekt ausgerichtet ist, kannst du ihn mit deinen Fingern auf der Klebefläche festdrücken.

    • Wenn du bereit bist, den Akku am Rahmen festzukleben, ziehe sorgfältig die blaue Plastik-Schutzfolie ab, um den Kleber freizulegen.

    • Setze den Akku vorsichtig an seinen Platz, ohne ihn festzudrücken.

    • Verbinde zeitweise den Akkustecker, um sicherzustellen, dass das Kabel den Anschluss erreicht.

    • Drücke den Akku rundherum gut mit den Fingern fest, damit sich der Kleber verbindet.

    • Trenne den Akku wieder ab, bevor du mit dem Zusammenbau weitermachst.

    the plug is actually not so easy to mount. luckily, I tried before removing the blue plastic liners. I ended up plugging the battery in before glueing it in place, just to be sure I could connect it at all, which worked fine for me.

    also, I recommend checking if the battery loads and whether the phone still works, before glueing the back cover on the phone

    Michael -

    Based on Michael’s comment above, I wanted to test to see how hard it was to electrically connect the battery. I am glad I did, as it would have been difficult to connect after the battery was mounted with adhesive (depending on where the battery sat within its compartment).

    My steps:

    1. Connect the battery electrically

    2. Cut the adhesive into a couple 1” strips, attach them to the back of the battery. (I tried to attach the whole adhesive to the battery and then pull the backing off, but it became kind of a hassle and didnt work too smoothly. I figured a couple strips would be adequate and it was)

    3. Press the battery into its compartment.

    Bill Slobotski -

    The directions mention that the adhesive can be repositioned if it’s not aligned correctly. This was definitely not the case for me. Once I put the adhesive onto the battery, I noticed it was slightly off, so I tried to lift it up to reposition it, and it ended up stretching and then getting crumpled. Not too big a deal for the battery, but could be an issue for the case.

    Dennis -

    Hi Dennis,

    Thanks for the comment! I’ll adjust the instructions to include your findings.

    Arthur Shi -

    Replaced battery. Have always had success doing that on my Samsung phones, but this time when set to charge it flashes for about 5 seconds with the percentage sign not even zero percentage sign, and then it goes off for three seconds, on for 5 seconds off for 3 seconds, on for 5 seconds off for 3 seconds. I feel like it's trying to tell me something but what? no problem opening the phone back up again but hesitant to do so as obviously I was not successful with battery replacement. Any suggestions?

    Deborah B

    mummafor2@yahoo.com

    mummafor2 -

    Hi Deborah! Please post your question in our forum, where more people will see it and be able to help you.

    Arthur Shi -

    Place the battery by aligning the top to the top of the well, then put it down lightly.

    The battery (that I received) is slightly smaller than the well. Optionally, as in the 1st comments, first plug in the connector, test it with usb connect and powering on. Then usb disconnect and power off. You can leave the battery connected while placing carefully to ensure connectability.

    I placed the battery aligning the bottom side first, since that side was partly no adhesive, discovering a small gap between the top side of the battery and the well. The connector could not reach the socket. Luckily, the battery was not yet adhered that much and I could lift the battery again.

    Eduard -

    For me the battery connector could not be aligned properly once the battery was positioned in place due to torsion on the battery cable. You must first position the connector so it is square with the connector in the phone, press it in, and only THEN move the battery into its final resting place. When I did it that way it was easy. With the battery already in place (but not yet fully stuck), it was impossible.

    blicher -

Abschluss

Für eine optimale Leistung, solltest du nach der Reparatur deinen neuen Akku kalibrieren.

Arthur Shi

Mitglied seit: 03/01/18

194403 Reputation

14 Kommentare

Fantastic job on the instructions ! I only wish I was able to find a solution, for removing the original glue from the back cover.

That is all I have left to do, and I have been unsuccessful for 6 to 8 hours of trying to find a way to get it off.

Lee Jones -

Hey Lee,

Your best chance is using high concentration (over 90%) isopropyl alcohol . If you can’t get the surface completely clean, that’s alright. Just try to get all large adhesive residue off, so that the battery and new adhesive will lie flat in the battery well.

Arthur Shi -

I accidentally rubbed off some of the black paste thing under the battery when cleaning it for the new battery adhesive strip. Should I be worried??

Henry Dang -

Hi Henry,

The black paste is possibly the graphite pad stuck onto the back of the display, which channels heat from the phone to dissipate through the display. There shouldn’t be any damage to your phone!

Arthur Shi -

Hi Arthur,

A big respect & thank you for the instruction to replace the battery. I couldn't be more happier because I did it myself thanks to you & ifixit team. It only took 30 minutes from start to finish. Just waiting on the back glass to arrive other wise excellent job on your side and awesome job to ifixit. I will have to buy higher concentration of isopropyl to wipe those big adhesive before I put the glass.

kar.kunal -

I’m glad to hear of your success! Keep fixing things!

Arthur Shi -

The Old Battery Connector SNAPS into place. but not the new battery i was sent. Could there be different Connectors??

Ted Fackelman -

Hey Ted,

This is a general guide for battery adhesive, so I can’t tell which phone you’re working on. Which phone are you replacing the battery for?

Arthur Shi -

91% percent isopropyl alcohol removes the residue very well. It is available at the local drug store about 2 dollars for a quart.

michael kotarba -

Greeting Arthur,

Thank you for the excellent, detailed instructions. I was able to replace my OEM battery without any problems. I do have a question related to charging the new battery. Your direction is: For optimal performance, calibrate your newly installed battery: Charge it to 100% and keep charging it for at least 2 more hours. Then use your device until it shuts off due to low battery. Finally, charge it uninterrupted to 100%. The instructions that IFIXIT sent with the kit was to allow it to run down to 10% then charge it to 100%. Is there a big difference here or are both methods okay?

Robert Fitzmaurice -

Hi Robert,

I’m glad you’re able to replace the battery! The proper way to calibrate the battery is to allow the device to run until it shuts off. This allows the battery management hardware to have a point of reference on what 0% is, and potentially reset any counter errors. For more details, check out this page.

Arthur Shi -

oops, forgot to clean off the old adhesive. is that going to be an issue? I already stuck on the new one...

Emily Lynn -

Hi Emily,

For the most part it should be fine, as long as there weren’t large uneven chunks of adhesive.

Arthur Shi -

I am unable to find adhesive tape for Galaxy s8 Active. Do you have a suggestion on what comparable tape might work on the s8 Active?

gboyles -