Einleitung

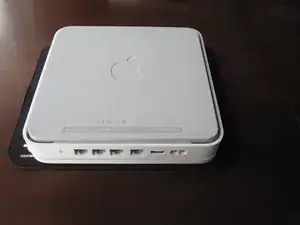
Diese Anleitung zeigt, wie man die Time Capsule zum ersten Mal öffnet. Lasse dir beim ersten Schritt Zeit, besonders wenn das Gerät schon älter ist, könnten die Klebestellen ausgehärtet sein.

  1. FFi6INEMTHmStsst
    FFi6INEMTHmStsst
    tXQan2X3WXLNjWkw
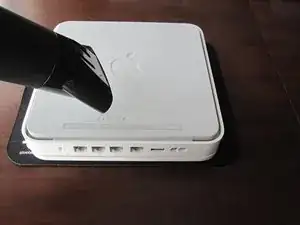
    • Lege ein weiches Tuch oder Ähnliches auf eine saubere und flache Oberfläche. Lege das Gerät mit der Unterseite nach oben hin.

    • Um die Time Capsule zu öffnen, muss als erstes die Gummifläche entfernt werden, unter der sich die Schrauben verbergen.

    • Benutze eine Heißluftpistole oder einen Haartrockner, um den Boden zu erwärmen; dies weicht den Klebstoff unter der Gummiabdeckung etwas an.

    • Beginne an einer Ecke vorsichtig den Boden anzuheben. Benutze einen Plastikheber oder Ähnliches, um das Gummi vom Metall zu trennen.

    • Lasse dir Zeit und pass auf, das das Gerät nicht überhitzt.

    • Wenn du dabei etwas Klebstoff mit abziehst, ist das nicht schlimm. Es ist genug Kleber vorhanden, um den Boden später wieder zu befestigen.

    • Beim späteren Zusammenbau kann auch wieder Wärme angewandt werden; dies hilft, den Kleber weich zu machen und das Gummi fest mit dem Metall zu verbinden.

    Slowly start peeling at one corner... worked better than shown on the pictures.

    Markus -

    Slow down particularly near the bottom label where it is stiffer. Either that or I needed to give it more heat. Going too fast can risk tearing the rubber base if the adhesive is strong.

    ElvinC -

    If you are wondering if the Time Capsule will still work as a router if you remove the HDD and leave it out, the answer (according to another webpage I read) is YES, it will still work. Apparently, you get a warning with the AIrPort Utility about a missing HDD, but it still works. I wanted to keep and reuse the 1TB Hitachi HDD for offsite data backup.

    CraigH -

    Use an iron instead of a heating gun or hairdryer!

    Gradually raise the temperature while checking for separation, while moving over the rubber. I first cleaned the rubber with some soap, to avoid scorching dust or grease. The setting for synthetic fabrics seemed to do the job with my Tefal iron; probably a little over 100 degrees centigrade. No steam off course!

    Worked like a charm without leaving almost any residual glue.

    Sticking the rubber sole back after the repair was also successful.

    Frits de Bruijn -

    Thanks for sharing this.

    kenatkenichikato -

    Adhesive tape used is Nitto No. 5015. I found a piece of a back-paper left underneath the rubber…

    vesa -

    Is there a possibility to change an already changed 2TB SATA to a bigger one? Mine is full. because I added another MacBook Pro, but I’d rather not buy a newer TimeCapsule

    Bette Rose -

  2. vOfiXMwL1vULiDpf
    vOfiXMwL1vULiDpf
    JocNoHh26TxaqZYY
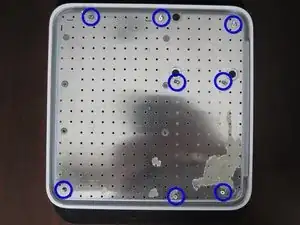
    • Sobald der Gummiboden entfernt ist, können die acht PH0 Schrauben ausgedreht werden, die den Metallboden festhalten.

    • Benutze einen PH0 Schraubendreher!

    • Einige Ausführungen der Time Capsule haben zehn Schrauben. Das Modell A1254 hat zwei Schrauben oben rechts und unten links, wie im zweiten Bild zu sehen. In diesem Fall musst du natürlich alle zehn Schrauben entfernen.

    Confirmimg 10 screws for Model A1355

    pkeenan8 -

    Larger screwdriver size can help with sticky screws.

    ElvinC -

    One of my screws was already stripped by Apple, so I had to drill it out.

    CraigH -

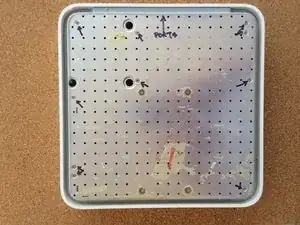
    Instead of removing the rubber floor, I cut windows in the rubber base at the designated places and dug them out. To do this, I had rectified the photo and printed it out as a square with an edge length of 19.8 cm and used it as a stencil.

    Statt den Gummiboden zu entfernen, habe ich an den bezeichneten Stellen Fenster in die Gummiplatte geschnitten und ausgehoben. Dazu hatte ich das Foto entzerrt und als Quadrat mit der Kantenlänge 19,8 cm ausgedruckt und als Schablone benutzt.

    Markus Kluft -

  3. XYdRTJhLR3xFYDep
    XYdRTJhLR3xFYDep
    J1xZt1YQBB25setC
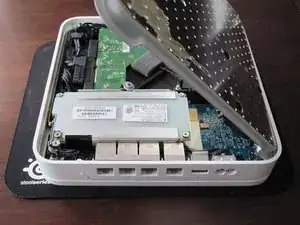
    • Drehe das Gerät so, dass die Rückseite (die mit den Netzanschlüssen) zu dir zeigt.

    • Hebe die linke Seite der Metallplatte an und kippe sie über die rechte Seite.

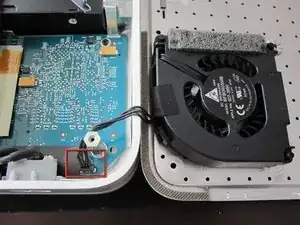
    • Um Schäden zu vermeiden, ziehe diese Platte nicht senkrecht nach oben. Wie im zweiten Bild zu sehen, ist der Ventilator an ihr befestigt und an der Platine in der Nähe des Einschaltknopfes angeschlossen.

    • Da vielen Leuten beim Lösen des Steckers der Stecker kaputtgeht, ist es nicht zu empfehlen, ihn zu lösen! Sei sehr vorsichtig mit ihm, er ist sehr empfindlich. Wenn du ihn wirklich lösen musst, löse ihn SEHR vorsichtig mit einem Spudger oder einer Pinzette.

    It is really not necessary to disconnect the fan and you risk breaking it off of the logic board. :(

    rdemby -

    I'd destroyed the connection between my fan and logic board by trying to remove the fan. This is a bigger problem than a broken hard drive. DO NOT TRY TO DISCONNECT THE FAN. Instead be careful with the base (making sure not to stretch the fan wire) as your proceed to step four.

    redmonton11 -

    I wish I had read the comments too!! DO NOT try to disconnect the fan!!!! The connector broke off with out a lot of force. Now I have a worthless piece of metal and plastic!!!!

    mightyquinn6362 -

    This is not my guide, but in order to try to prevent future damage, I've edited the guide to warn against disconnecting the fan from the logic board. Hopefully the update will be approved soon :0\

    Jeff G -

    Replaced 2 x 1500 uF capacitors ant the Time capsule is back to work !

    Thanks for this guide.

    gilberto -

    I had no issues removing the fan plug from the board.

    angelopadilla -

    I used a block to lean the cover on so it didn't fall completely flat on the surface. The wire connecting the fan is too short for that.

    pkeenan8 -

Abschluss

Um das Gerät wieder zusammenzusetzen folge den Schritten in umgekehrter Reihenfolge.

rousp

Mitglied seit: 18/02/10

6631 Reputation

6 Kommentare

I accidentally edited this page, instead of the fan. Could anyone tell me how to reverse that/reverse it for me? Thanks!

Jamy Mahabier -

Just un-edit the page to what it used to be.

Reid Fleishman -

must I put back on the rubber bottom or can I leave it off for maximum airflow?

Strider -

My thought exactly. I left it off and put small felt pads on each corner for noise reduction AND for better airflow.

Tkappock -

cann anyone tell me what kind of screws the timcapsul has on the bottom, I kind of lost them and need to get replacement screws but io can not find anything under PH0 Screws online…

ginol95 -

My TC was made lot of noise and warming. (I thonk was the HDD problem) When I opened and tried disconnect the fan it broken the board plug… Today I use without fan, the noise is over (was the fan) and it continue warming same way…

George Nass -