Einleitung

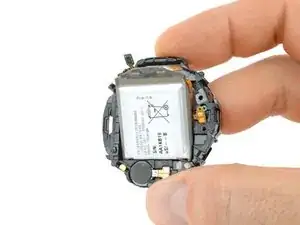
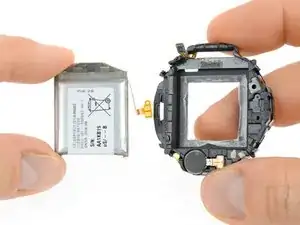
Benutze diese Anleitung, um den defekten Akku deiner Samsung Galaxy Watch zu ersetzen.

Wenn dein Akku aufgebläht ist, musst du entsprechende Vorsichtsmaßnahmen treffen. Zu deiner Sicherheit solltest du deinen Akku auf unter 25% entladen, bevor du mit der Reparatur beginnst. So reduzierst du das Risiko, dass sich der Akku entzündet oder explodiert, falls er während der Reparatur versehentlich beschädigt wird.

  1. oX1ZMHLHIYw4KRAU
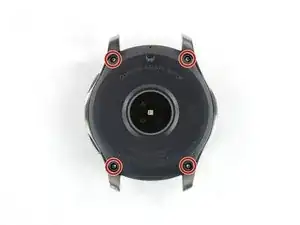
    • Entferne die vier Tri-Point #00 Schrauben (4,2 mm Länge) auf der Rückseite der Uhr.

    I can't get them to budge

    Irene -

    Same here, its impossible to get the screws off. They’re almost stripped now too.

    Prabhat -

    Sorry to hear that. Here are some tips on how to get those screws off hopefully: Wie man eine rundgedrehte Schraube entfernt

    Tobias Isakeit -

    Just started working on watch. Can not get the screws out. I purchased the recommended tools. Screws won't budge. I have not stripped them yet. How do I get them to loosen up?

    joyce c -

  2. lPBjwQQaeOfSOTcg
    lPBjwQQaeOfSOTcg
    nPHfqyJPI3ouvl2h
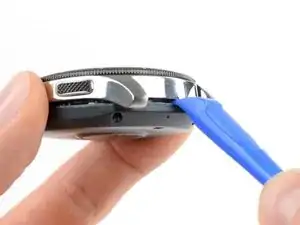
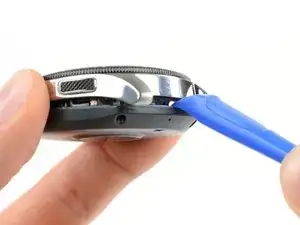
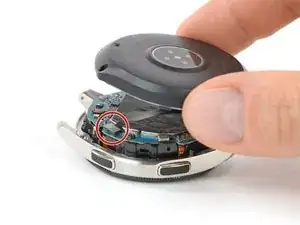
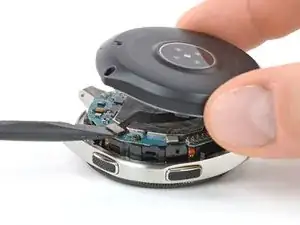
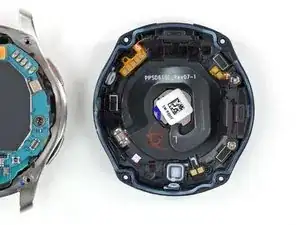
    • Setze ein Opening Tool zwischen die Rückabdeckung und das Metallgehäuse der Uhr.

    • Heble vorsichtig die Rückabdeckung aus Plastik auf.

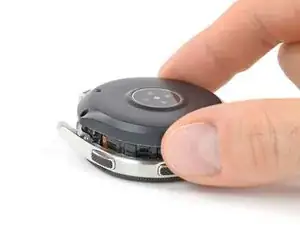
    • Entferne die Rückabdeckung noch nicht. Darunter befindet sich ein Flachbandkabel, das zum Kernstück im Inneren führt.

    You may need to use a small screwdriver or letter opener to pry the case apart. I found with two different spudgers I could not get it to budge.

    Tim Durstenfeld -

    How do I Secure the sealing, and wish material du you use?

    Ejner Bøndergaard -

  3. UMxKpnXkjwF5GcQS
    UMxKpnXkjwF5GcQS
    2NKWLQdU53qmrDhn
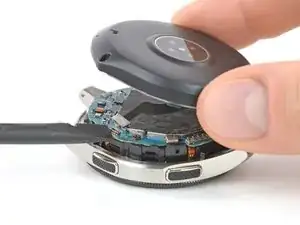
    • Lege die Uhr hin und hebe die Rückabdeckung an, um an den Sensor-Stecker auf dem Motherboard zu gelangen.

  4. YYnqRGUNNCiHtx5A
    YYnqRGUNNCiHtx5A
    f12LRmjkvJO1nq4D
    • Trenne das Sensor-Flachbandkabel mit einem Spudger vom Motherboard ab.

    My 2019 Gear Sport has no flex cable it used a post where the flex cable is. This plugs into the mother board.

    Much better for disassembly.

    William Barron -

  5. xiguJEsYbbLXMC1y
    xiguJEsYbbLXMC1y
    JJ4DvvUUBsjgbQFg
    GXeRPa2QyJplrLfW
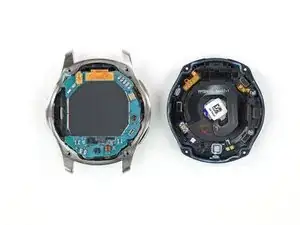
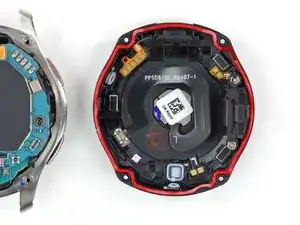
    • Entferne die Rückabdeckung.

    • Achte beim Verschließen der Uhr darauf, dass die Gummidichtung unversehrt ist oder ersetze sie gegebenenfalls durch eine neue.

    Has anyone seen a listing for the gasket?

    DaChew -

    anyone where can find the rubber gasket?

    Melvyn Chang -

    is the gasket the Adhesive? If not, what adhesive suggested and how do you apply it?

    batato kr -

    No, the gasket is not the adhesive. As adhesive you can use this under the battery.

    Tobias Isakeit -

    woher bekomme ich eine neue gummidichtung?

    Anja Müller-Dreßler -

    Hat jemand eine Quelle für die Dichtung der Rückabdeckung (rote Dichtung, 3. Bild Schritt 5). Hat jemand versucht die erfolgreich selber herzustellen?

    Helge Korz -

    Falls jemand die Gummidichtung im Netz findet, gerne hier posten. Wir konnten bisher noch keine finden. Selbst rounded.com hat es nicht, und die haben recht viel für (Samsung) Smartwatches.

    Tobias Isakeit -

  6. DsLIjXTpV6SEOLfq
    DsLIjXTpV6SEOLfq
    dJjbQPTfgs1tIWMe
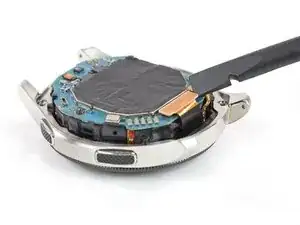
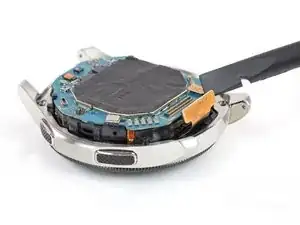
    • Benutze einen Spudger, um das Display-Flachbandkabel vom Motherboard zu trennen.

    My display flex cable is cut … is it possible to replace only cable without changing display… if yes please leave a link to buy it

    Akshat Dev -

  7. fcqqMSnq6jErw2dl
    fcqqMSnq6jErw2dl
    sQYyUALKDHUIONNR
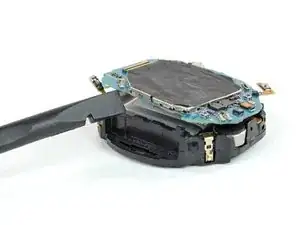
    • Hebe das Kernstück aus dem Gehäuse.

    • Der Plastikrahmen des Kernstücks sitzt recht fest im Gehäuse.

    • Führe das Display-Flachbandkabel vorsichtig durch die Lücke im Plastikrahmen des Kernstücks.

  8. eH156QnMpc3Rj5Nm
    eH156QnMpc3Rj5Nm
    2tMbYcmIAjk1fAqX
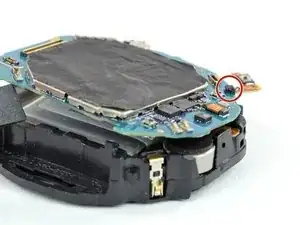
    • Trenne das Kabel des Hall-Sensors mit einem Spudger ab.

  9. WQR2M61RsVDR4uJy
    WQR2M61RsVDR4uJy
    CQFHFreOTaGVMrah
    6LNfZEXhZyGsmaSt
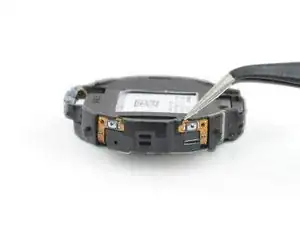
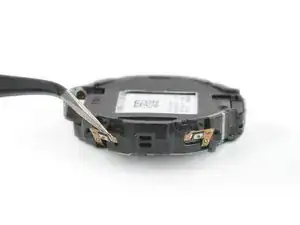
    • Löse die beiden Tasten-Kabel vorsichtig mit einer Pinzette vom Plastikrahmen ab.

  10. fpPT5V1FjJDLAERE
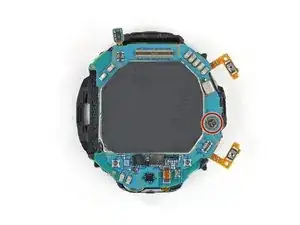
    • Entferne die einzelne Kreuzschlitzschraube #00 (3,4 mm Länge).

  11. GkeT53uBPpCDCoxi
    GkeT53uBPpCDCoxi
    nwJL1vItmEwNSeJr
    LjUXCYMYVXAaSB5H
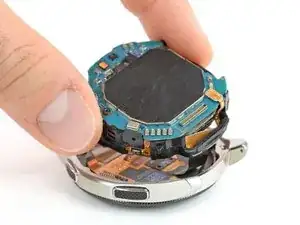
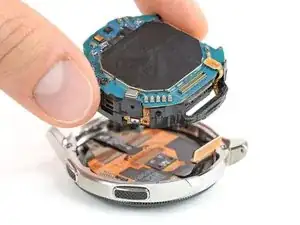
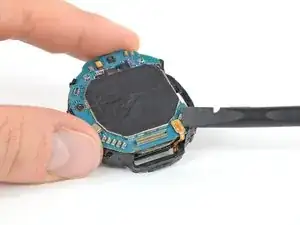
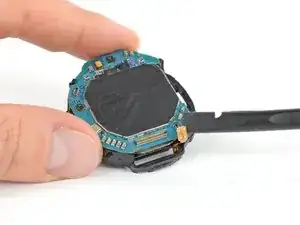
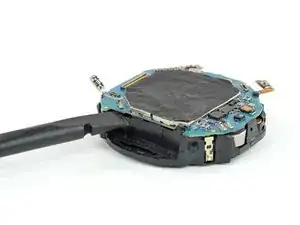
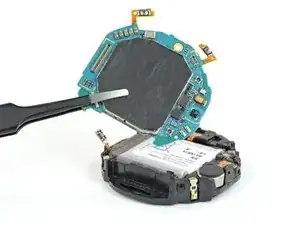
    • Setze einen Spudger in die kleine Lücke unter dem Motherboard, wo sich der Ausschnitt im Plastikrahmen befindet.

    • Hebe das Motherboard an, indem du den Spudger drehst.

    • Schiebe das Motherboard aus der Kunststofflasche heraus.

    There is a plastic clip holding down the motherboard in the corner opposite to where you’re prying. After lifting slightly, the motherboard should be slid out from underneath that clip to avoid damaging it.

    Mark Ingram -

    Thanks for the hint. Added an additional image and bullet to point that out.

    Tobias Isakeit -

  12. fJh3pESPYPd6pgRk
    • Entferne das Motherboard.

    Where can I get a motherboard?

    lorne serpa -

  13. sPb6PT5h4FsMLHnn
    sPb6PT5h4FsMLHnn
    PfollvtpSVEaEkAp
    U4ZJeXG5g5bwuCAO
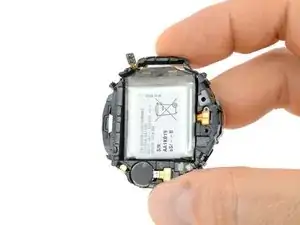
    • Drücke den Akku durch den Ausschnitt im Plastikrahmen aus seiner Vertiefung heraus.

    • Das Akkukabel kann unter Umständen leicht am Plastikrahmen festkleben, ziehe daher sehr vorsichtig.

    • Entferne den Akku.

    For removing the button cables I used a very fine precision flat screwdriver to prise them out rather than tweezers

    dangel888 -

    Wo war denn das Kabel vom Akku vorher befestigt? Musste man das vorher lösen? Fehlt dieser Schritt in der ansonsten sehr detaillierten und guten Beschreibung? LG Heidi

    loohzee -

    Das Kabel vom Akku ist nicht wirklich an etwas befestigt. Es hat auf der einen Seite lediglich die beiden Kontakte (goldene Rechtecke) welche über zwei Federn, die am Motherboard sitzen, den Kontakt herstellen und auf der anderen Seite ein wenig Klebstoff, mit dem es in seiner kleinen Vertiefung befestigt ist.

    Tobias Isakeit -

    FANTASTIC!! Thank you for your help!

    Matt Benson -

Abschluss

Schalte dein Gerät wenn möglich ein und teste deine Reparatur, bevor du neue Klebestreifen anbringst und das Gerät wieder verschließt.

Befestige den neuen Akku mit vorgestanzten Klebestreifen oder doppelseitigem Klebeband. Um den Akku korrekt zu positionieren, musst du das neue Klebeband an die Stellen in das Gerät kleben, an denen vorher die alten Klebestreifen waren, und nicht direkt auf den Akku.

Um dein Gerät wieder zusammenzubauen, folge den Schritten dieser Anleitung in umgekehrter Reihenfolge.

Für eine optimale Leistung solltest du deinen neu eingebauten Akku kalibrieren: Lade ihn auf 100% auf und lasse ihn noch weitere zwei Stunden laden. Benutze dann dein Gerät, bis es sich von selbst wegen eines leeren Akkus ausschaltet. Lade es dann ohne Unterbrechung auf 100% auf.

Lief die Reparatur nicht wie geplant? Versuche es mit einer grundlegenden Fehlersuche oder stelle deine Frage in unserem Antwortenforum.

Entsorge deinen Elektromüll fachgerecht.

Tobias Isakeit

Mitglied seit: 31/03/14

98264 Reputation

34 Kommentare

thank you,it really help alot

Otunla oluwashina -

Where can I buy the battery?

Buzz Burrows -

Where can you buy the battery 42mm version?

Thomas -

We hope to have them in our store soon. Check on our Samsung smartwatch parts over at https://www.ifixit.com/Store/Parts/Samsu...

Tobias Isakeit -

How much does this cost for a battery and labor

Audrey Snit -

labour is pretty straight forward, can do it youself. i payed around £15 for a battery and tools

Gueseppe Volpati -

The battery charged after replacing and the screen showed it was charging but it will not turn on. Says 100%

Misty scheuerman -

You might want to try and restart the watch. Sometimes just leaving it on the dock (no power plugged in) will bring it back to life.

Tobias Isakeit -

merci , fantastique c est facile à suivre et il ne manque rien

merci à l l'auteur et aux traducteurs

Cordialement

Jean Pierre

Jean Pierre Fenech -

Tobias Isakeit

just finished the install on the new Battery after taking the old one out over a week ago. Needed to wait for the new battery to be back in stock. With this guide, it was a cinch.

Hope to see more on other devices.

Roger Owen -

Good guide. Only issues: I had to use a metal tool (like a letter opener) to very carefully pry the case open as no plastic spudger was working, and then when i got to pulling the motherboard/battery assembly out it just would not come out for some reason (I did coax it out eventually). Otherwise very straightforward process. Hoping my Galaxy watch works reliably again! (Charging up now, but already verified it still works!)

Tim Durstenfeld -

Great step by step, lots of care put into it as it was SUPER easy to follow.

The only think I could think of to add value to this is to add best practices and lessons learned to each step. I purchased the tools from IFixit but I had a hard time trying to get between the metal frame.

Sean Swift -

I so appreciate these instructions and the toolkit. I just replaced the battery and everything is in working order again. Thank you! As someone already mentioned, the only part I had trouble with was Step 2. The opening tool was not slim enough to insert between the back cover and the metal housing. I had to use a razor blade/box cutter blade and was careful not to hurt myself, but that did the trick. Also, the hall sensor flex cable (see Step 8) entirely came off of the plastic frame during step 13. I must have bumped it when removing the battery. From the pictures, I was able see how it should be reattached, so that turned out ok as well. Thanks again for making this possible! Go IFIXIT.com! These instructions are helping give new life to our valuables and keep them out of landfills!

Andrea Killory -

I have a samsung galaxy active 40mm watch, will the 42mm replacement battery work with it? I have been unable to find a 40mm replacement battery anywhere on the internet.

Drew Gates -

Excellent!! This is exactly what I needed. The most difficult thing was finding a y00 bit but that came in an ifixit toolkit I found at a

jamesbyassrascoe -

Good morning, is the waterproof lost when the battery is changed? Thank you

IgPe -

Wow, perhaps the most clear, precise, concise, well illustrated & carefully designed set of step-by-step instructions that I've ever seen. Thank you, I couldn't have even begun to do this without you. Great photos too.

Mark Barry -

Excellent instructions.

Philip May -

What Adhesive is suggested? How and where do you apply the Adhesive? And is the Watch still Waterproof after installing the new battery?

batato kr -

I would double down on this question. Can you please answer it?

Ecaflipe -

As adhesive you could use double sided tape. It’s meant for under the battery (if it does not come with adhesive pre-installed). That will keep it in place (although it already sits neat between the motherboard and the core frame—you might get away without adhesive).

Regarding the water proof topic: It’s about that rubber gasket on the back cover (see step 5 last pic). If it’s not damaged you should be fine. Unfortunately we couldn’t find a listing for that gasket, yet.

Tobias Isakeit -

Thank you for the excellent instructions! I was able to finish in ~40 minutes, despite having difficulty opening the bottom case for a while (the seal was good and sealed :).

Mark Ingram -

I have a question. What adhesive are you talking about? And where can I buy some? I want to make sure I'm fully prepared before doing this.

Marlyssa Chhay -

As adhesive you could use double sided tape. It’s meant for under the battery (if it does not come with adhesive pre-installed). That will keep it in place (although it already sits neat between the motherboard and the core frame—you might get away without adhesive).

Tobias Isakeit -

Thank you very much for your guidance in this problem it was very helpful and easy to complete

Ernie Coppin -

hello will the watch be waterproof even after i replace the battery?

Qemal Dariu -

Since the back cover is screwed-on it should be as water resistant as before providing an intact gasket (see step 5).

Tobias Isakeit -

Is it possible to replace the battery with one that will be higher performing or is the amh not able to be upgraded

M. Mc -

If you find a battery with the same specs but a higher mAh it should work (the voltage is the critical part for the watch to be able to charge it properly).Although I have no experience on how the watch calculates charging time and battery status. If you find more information on this (or try it out yourself), please share here for others to read :)

Lots of success

Tobias Isakeit -

Can I send my watch to you for battery replacement??

Larry

KBL -

Hi KBL, we are convinced you can accomplish the repair yourself. That is what we want to accomplish with this platform—empower people to fix their devices. If you need tools you and get them in our store (and some spare parts as well). We don’t offer a repair service. But their might be (authorized) repair shop near your place if you feel better giving it away for repair.

Tobias Isakeit -

Followed your guide and was shocked at how easy it was but after I finished the watch is now over heating. Has this happened with anyone else?

Gaven Vance -

I have not attempted the battery replacement procedure on my Samsung Watch yet but I have used IFixit instruction modules for several other items all achieving success. I am confident therefor that my watch battery replacement will go equally successfull as long as I still have a steady hand. Thank you for this service it is important.

glynn -

Where can you buy a new gasket?

go2guy -