Einleitung
Der Austausch des Akkus ist recht einfach. Benutze ein antistatisches Armband und Matte, damit keine Schäden durch Stromschlag entstehen.


Ersatzteile
-
-
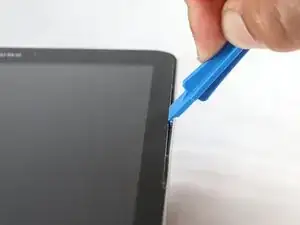
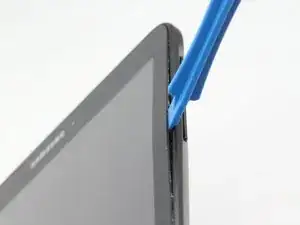
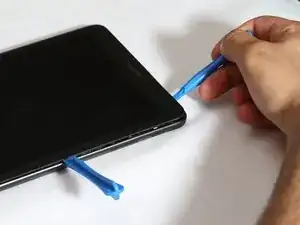
Setze eines dieser blauen Plastiköffnungswekzeuge zwischen Displayglas und dem Gehäuse ein. Es ist egal, wo du anfängst, wenn du irgendwo einen Spalt geöffnet hast dann kannst du den Spalt rings um das Gerät erweitern.
-
Die Displayeinheit und das Gehäuse sollten sich danach gut trennen lassen.
-
-
-
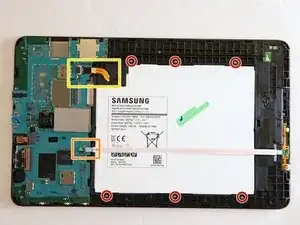
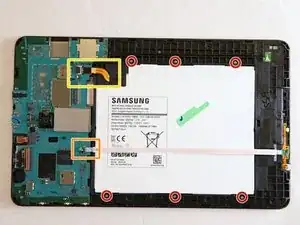
Auf der Rückseite des Displays sind alle wichtigen Bauteile des Tablets, inklusive des Akkus, befestigt. Du musst sechs 3 mm Kreuzschlitzschrauben und zwei Flachbandkabel entfernen.
-
-
-
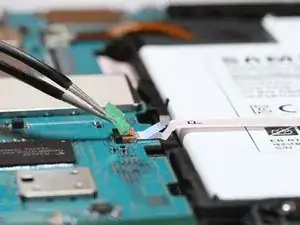
Entferne zuerst das längere der beiden Flachbandkabel. Es verläuft über den ganzen Akku. Im Bild zu Schritt 2 ist es orange markiert.
-
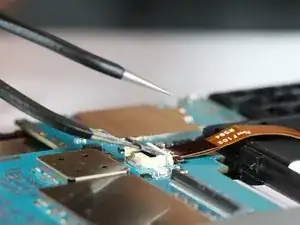
Entferne vorsichtig mit einer guten Pinzette das grüne Klebeband von der Klappe am Ende des Flachbandabels.
-
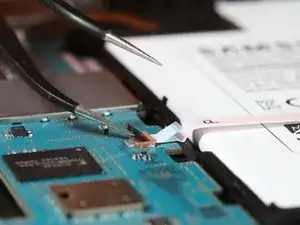
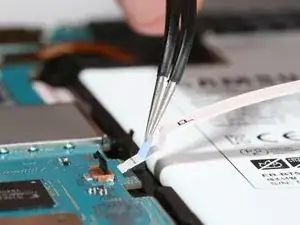
Hebe die Klappe hoch und schiebe das Flachbandkabel aus dem Anschluss heraus.
-
-
-
Entferne nun das zweite, breite und orangefarbene Flachbandkabel. Das Verfahren ist ähnlich wie in Schritt 2. Im Bild zu Schritt 2 ist es gelb markiert.
-
-
-
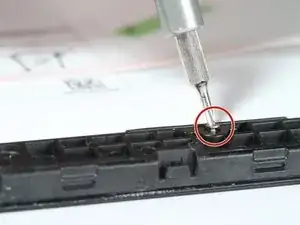
Entferne sechs 3 mm Kreuzschlitzschrauben #000 um die Akkufassung. Die sechs Schrauben sind im Bild zu Schritt 2 rot markiert.
-
-
-
Wenn die sechs Schrauben und die beiden Flachbandkabel weg sind, lässt sich der Akku leicht von der Displayeinheit entfernen.
-
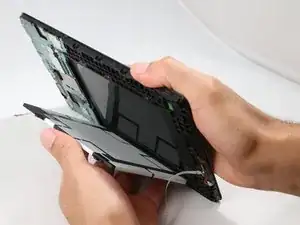
Fasse das Tablet auf beiden Seiten mit einer Hand fest an und kippe es einfach herum, so dass der Akku in deine andere Hand fällt.
-
Wenn der Akku doch nicht herauskommen sollte, dann überprüfe nochmals, ob wirklich alle sechs Schrauben und die beiden Flachbandkabel entfernt sind.
-
Um dein Gerät wieder zusammenzusetzen, folge den Schritten in umgekehrter Reihenfolge.

8 Kommentare
thanks. busted the screen in 2 seconds flat!
Here are some tips to pry the cover off without damaging the digitizer: the cover is cemented with adhesive tape, making it hard to insert a tool into the seam, so heat the edge only first. Once you have it warm (not hot), use all of your fingers on the power button side to pull the plastic edge, using your thumbs to press on the back - do not try to pry or press against the glass side. Also, do not slide the pry tool under the glass and lift up, you can crack the glass. It takes patience
seadawg -
First step is not easy. Do what seadawg did above. Dont bother with plastic tools. Start near the power button. Dont try to go between the screen and tablet. Pull back the plastic instead. I wish I had read seadawgs advice first, would have saved me a digitiser and a load of time…
*****Please be careful when removing the rear cover. The edge of the screen is very vulnerable and easy to break!!!! *****
Bev -
removing the back can be quite difficult. i found that the tools provided were absolutely useless. A guitar plectrum is much better. be careful on the top edge because the digitiser connector is there and you can easily cut thro it. Apart rom the aforementioned its dead easy.
jim beeby -
I started at the power button. Using a tin metal pry tool you have to push straight down, stop, lever away from the screen a little then push down again until you feel the snap of the back cover come away from the frame. repeat these steps working slow down the tab and along the bottom then up to the top.
vickyjean1007 -
*thin metal pry tool
vickyjean1007 -
Bear in mind that the outer edge of the screen rests on a thin ledge of the back cover so you cannot just pry straight down.
vickyjean1007 -