Einleitung

Hier wird der Austausch des Akkus im Galaxy Tab A 10.1 gezeigt.

  1. GZ2Pki1FpHlvCO3S
    GZ2Pki1FpHlvCO3S
    5VJRorbfRR23MCuC
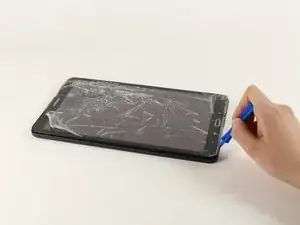
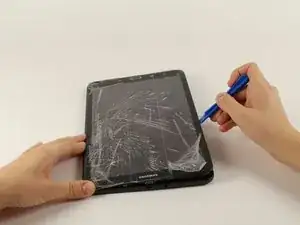
    • Lege das Gerät mit der Vorderseite zu dir.

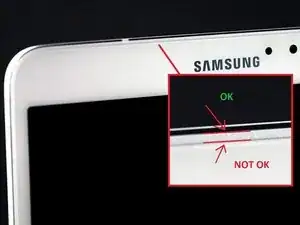
    • Fange an einer der abgerundeten Ecken an. (Vergleiche mit Bild 2).

    • Setze ein Plastiköffnungswerkzeug zwischen Vorderteil und Rückteil.

    • Wenn ein Plastiköffnungswerkzeug nicht funktionieren sollte kannst du es mit einem Metallspatel probieren, dies könnte allerdings den Kunststoff beschädigen.

    • Denke dran, dass du als erstes eine eventuell vorhandene micro-SD-Karte entfernen musst.

    AWESOME!! I was trying to open it from the “NOT OK” place and you saved me to broken the screen… thanks!!

    David Leiva -

    No problem, enjoy.

    Roger L. Ortiz -

    Felt it was easier for me to do it from the middles out.

    Tanin Garcia -

    Well then you are messing up the digitizer part, which sucks to replace on your own because it will never be stable again, ghost touches with fake digitizer with fake 3m double sided tape that doesn’t stick..

    Roger L. Ortiz -

    Important: the display is sourrounded with a plastic frame. You need to get beween this frame an the backcover (not directly at glass edge as I tried it first and almost broke the glass). Get a closeup picture of it to clarify.

    Oliver Dawid -

    wer lesen kann, ist klar im Vorteil - ich hab die SD-Karte drin gelassen. Hat aber funktioniert…

    Thomas Wolter -

    Don’t use a very small flathead screwdriver as a spudger. Just shattered the screen :(

    nikvoss -

  2. FEt6AIIjfR5mPXQH
    FEt6AIIjfR5mPXQH
    SOQODCRyQZlwVvj1
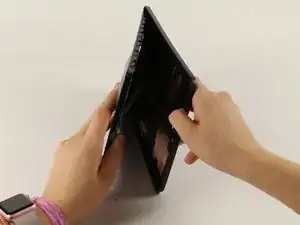
    • Wenn du das Werkzeug einsetzen konntest, dann schiebe es rings um das Gerät, um die Teile zu trennen.

    • Hebe den Rückdeckel vom Gerät weg.

    • Beim Öffnen wirst du klickende Geräusche hören.

  3. aKoSIwKnMC1lAyYP
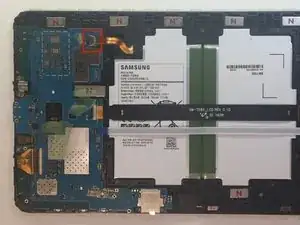
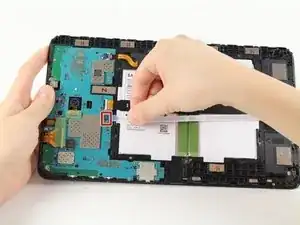
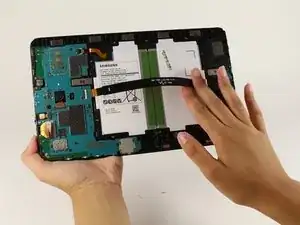
    • Entferne den Klebestreifen und klappe den Sicherungsbügel am ZIF Verbinder des Akkus hoch.

    • Schiebe das orangene Flachbandkabel zum Akku aus dem ZIF-Verbinder heraus.

    BEWARE!!! later on Samsung tablets the tab holding the main cable (marked “MAIN”) breaks as soon as you attempt to lift the tab to remove the ribbon! I reckon Samsung designed this breakabloe tab to not only avoid the warranty, but the render the tablet useless!

    graham chapman -

    Happened to me also, in order to replace that broken tab, do you think it will be necessary to replace the motherboard? I highly doubt we can find the parts to fix (replace) the flip-tab.

    jeanuhlik -

    I also had this problem, the connector broke, even if i was very careful, i still can use the tablet, i pushed the “main” cable in place and used a little bit of hotmelt glue to hold it in place.

    Yannick -

    I tried using aluminum foil to make the connection but it didn’t help at all, how did you attach it with the glue gun???

    jeanuhlik -

    LOOK what I found!!! its the replacement for the connector we broke!!!https://www.parts4repair.com/samsung-gal...

    jeanuhlik -

    I wish I had read this thread before I removed the cable and broke the connector. Unfortunately I have not been able to reattach the cable and my tablet is dead.

    If there is no way to remove this cable, why is this fix even posted here? I find this exceptionally uncool!

    Derek N. Eder -

  4. 1OplFVIHHB6iE5cO
    1OplFVIHHB6iE5cO
    rwOOcqLwpiM2JFMo
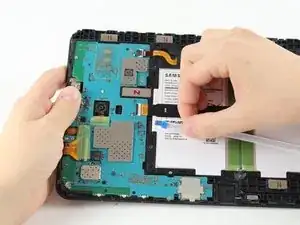
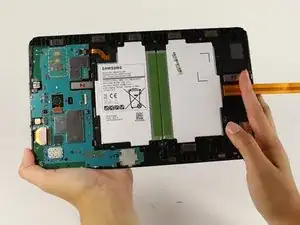
    • Entferne den Klebestreifen, hebe den Sicherungsbügel hoch und ziehe das weiße Flachbandkabel zum Lautsprecher heraus.

  5. 1uZdAEXRWTnJfwkc
    1uZdAEXRWTnJfwkc
    QNlFwvR4JP4LMckg
    vBRRQDtXcrOZQgDV
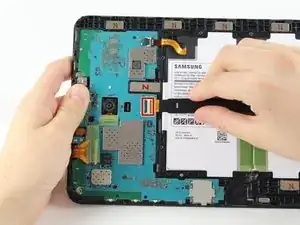
    • Hebe den Sicherungsbügel hoch und ziehe das schwarze Flachbandkabel zum LCD heraus.

    It's possible to replace only the lcd cable connector? Ist das möglich nur das Flachbandkabel zu tauschen?

    Lima -

  6. O4bvieDFdNTtVvWS
    O4bvieDFdNTtVvWS
    pSQTogUPIWyaBqa3
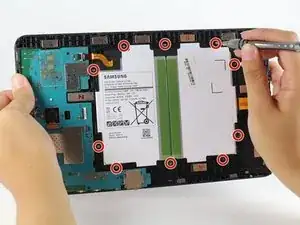
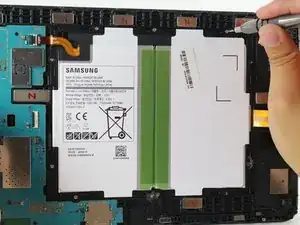
    • Der Akku ist mit zehn 4 mm Kreuzschlitzschrauben #000 gesichert. Drehe sie heraus.

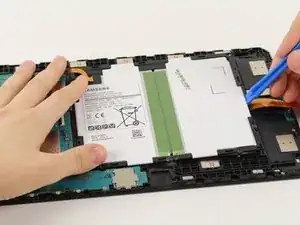
    • Schiebe ein Plastiköffnungswerkzeug unter den Akku in der Nähe der Lautsprecher und hebe ihn hoch.

    • Der große schwarz-weiße rechteckige Block ist der ganze Akku. Beschädige ihn nicht.

Abschluss

Um dein Gerät wieder zusammen zu setzen folge den Schritten in umgekehrter Reihenfolge.

Isabella Li

Mitglied seit: 02/10/17

2181 Reputation

7 Kommentare

Used this guide up until the disconnecting of the battery in order to fix the black screen of death. Very very helpful. Thank you.

Steffan Syd Apel -

If you have my kind of bad luck — where the latch for the battery flex cable connector sticks to the tape when you remove the tape, and then it will not snap back into place — don’t worry about it too much, because the connector tension will hold the flex cable in place. Just put the tape back over the top as directed.

Richard Ekblaw -

Why does it say you need a heat gun?

Geert Pante -

To loosen the adhesive. A hair dryer works well too

qaisraja22 -

how to calibrate the new battery?

when device switched off due to 0% of battery - there is impossible to boot it even with charging. there is required to open a tablet and charge the battery from another source.

Алексей Хейдоров -

Used this guide when the device was charging, only showing the charging symbol and it would not turn on. The screen was flickering as well, still wouldn’t turn on. However, this guide helped immensely! Fixed it in a few minutes! Take your time with the clips and make sure that you remove the lever before slowly pulling out the ribbons! Easy Fix!

Jermaine Hall -

Thank you for the guide it worked a treat, no problems what so ever (touch wood).

Derek Anson -