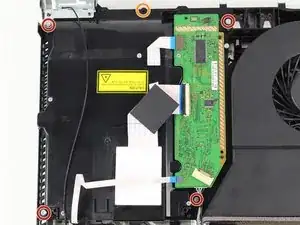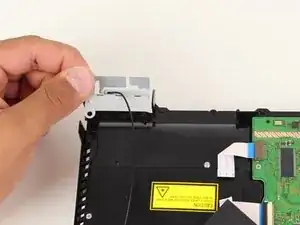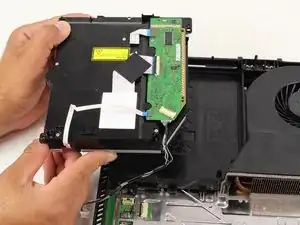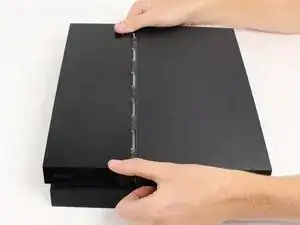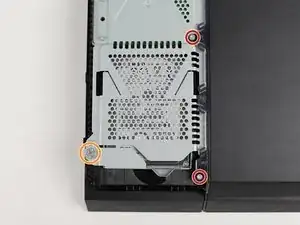
Einleitung

Wenn deine PS4 oft in Betrieb ist und der Lüfter häufig läuft, kann es zu einer Überhitzung kommen. Dann muss der Lüfter gereinigt oder durch einen Neuen ersetzt werden. Bitte beachte, dass beim Öffnen des Gerätes die Garantie von Sony erlischt.

  1. iEw34r6UEPlfvDAG
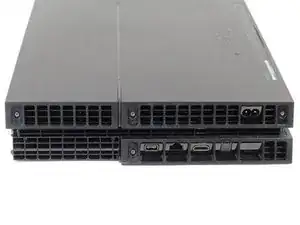
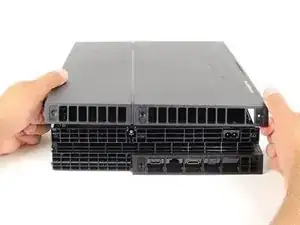
    • Drehe die PS4 so, dass der Boden nach oben zeigt und die Anschlüsse auf deiner Seite liegen.

  2. nQ1FQm4txAICMXbs
    nQ1FQm4txAICMXbs
    EK1TODlCVeFiLJt3
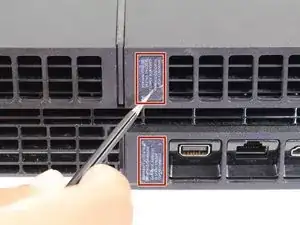
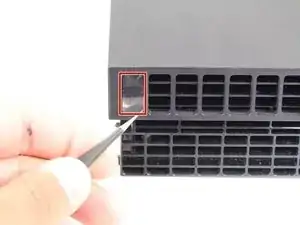
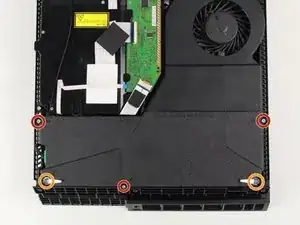
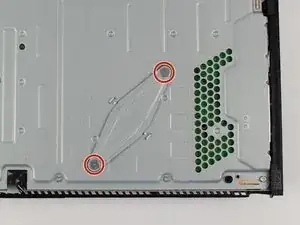
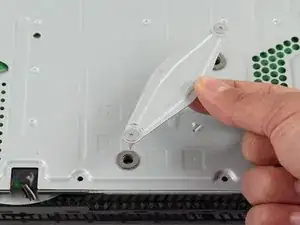
    • Entferne die beiden Garantieaufkleber vorsichtig mit einem Schraubendreher.

    • Achtung: Bei entfernen oder beschädigen der Garantieaufkleber erlischt die Garantie des Herstellers.

    Not true, removing stickers can’t void warranty as that’s illegal.

    Keyser Soze -

    Io però al di dietro ho solo 2 viti, quelle centrali. Come faccio?

    manuel gentili -

  3. PRXVWUDJLgaTIKqf
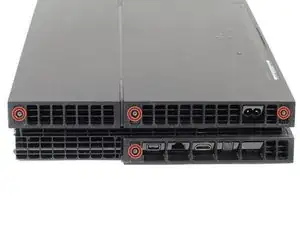
    • Löse die vier 9mm TR9 Torx Security Schrauben auf der Rückseite der PS4.

    Depending on the model of PS4, (i.e. CHU-1001A vs. CHU-1215A) it may only have the two screws in the center, not the edge ones.

    Sawyer Coe -

    In den Werkzeugen sind:

    Werkzeuge

    Pinzette

    TR8 Torx Security Screwdriver

    Spudger

    Phillips #0 Screwdriver

    Compressed Air

    aufgeführt, bei diesem Schritt wird von einem TR9 gesprochen, wird dieser benötigt und wurde in der Werkzeugliste vergessen oder ist es ein Tippfehler?

    Robert Oktabec -

  4. N3CPcTv3CKuNteDm
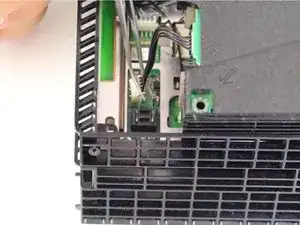
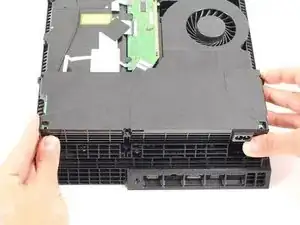
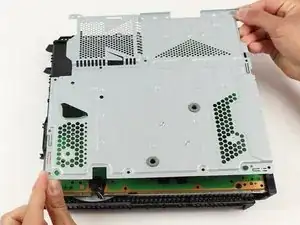
    • Entferne die Unterseite der PS4 von dem Hauptteil. Hierzu einfach die hintere Seite anheben und vorsichtig nach oben und vorne drücken.

    This can be extremely tricky to do. Some force is needed and if using a tool to pry it open (and this might very well be necessary) you risk damaging or breaking the plastic. Just take your time and be mindfull of where you place your pry tools.

    Joakim Johansson -

    Found a video that shows how to do it when it’xs only two screws

    https://youtu.be/yTunkv7688c?t=42

    Frida Svanberg -

  5. 15rDZS3s3xkASeCN
    • Entferne die drei 9 mm TR9 Torx Security Schrauben des Netzteils.

    • Entferne die beiden 4 mm Kreuzschlitzschrauben #1.

    It looks like that for CUH 1216A model, security TR8 and PH0 fits better

    sartoric -

  6. PuJcoIcSteWubwtk
    PuJcoIcSteWubwtk
    wCFpNhCgmN2IDJjM
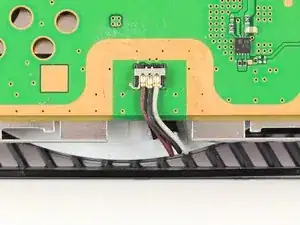
    • Trenne den Netzstecker von der internen Stromversorgung.

    • Hebe das Netzteil an, um es aus dem Gehäuse zu entfernen.

    you need to lift the power board/box up vertically first as there are 2 long prongs extending up into the box. if you try to lift just one end you will bend the prongs.

    pollytintop -

    has anyone used any of these guys, i don't fancy doing it

    http://www.trustedrepairs.co.uk/electron...

    Damian -

    during this step it exposes a black phillips head screw at least on some models(such as mine) this screw mates the metal sandwich around the motherboard together. I was unable to perform step 19 until I released this Black short Phillips screw.

    gfinch1 -

    I just came across this screw at the same time. It is extremely stuck and I'm afraid to strip it. Any ideas?

    Richard Maya -

    The picture shows the power supply connector being removed from the main board instead of the power supply. This conflicts with the instructions which are correct given how it was most likely put together.

    Clay W -

    This is a poor instruction. Obviously you need to lift the psu out first but on my white ps4 it simply won't budge on one side. Now I'm stuck already.

    Rainer De Temple -

    Rainer, look at pollytintop’c comment. Lift vertically and you will get to next step. I used a screwdriver on the side opposite the fan, but I am a savage in many ways. If you insist on treating it delicately a small suction or powerful tape might work.

    We may not all make it back. Good luck

    Mello -

    Guten Tag,

    an dem Mainboard meiner PS4 ist die Buchse mit den Metallstücken drin, wo man den Stecker des Netzteils reinsteckt, abgebrochen. Als ich das Netzteil rausnehmen wollte, habe ich viel zu fest gezogen und nun ist es ab.

    Bilder: https://imgur.com/a/hIMeWTh

    Welche Methoden gäbe es dieses Problem zu beheben?

    Mit freundlichen Grüßen

    JotEssYT -

    It feels very stuck, but if you can just get the “more" stuck end up a little first (I gently used a screwdriver as a skinny finger) and hold it there with your real fingers, you can get the easier side up a little too, then lift both together simultaneously with your hands. (1001a model, here)

    Mr. Porter -

    Tip is to turn it upside down n gently wiggle the weight of it will bring it out

    Chicky Boy3 -

    the only way I found to unplug this was to have tweezers holding down the outer connector, then using your fingers to pull firmly but gently on the wires close to the connector, with some wiggling

    noah.mooresmith -

  7. prMqSOonRco2BtHA
    prMqSOonRco2BtHA
    sQspFjHwJ56hgmqp
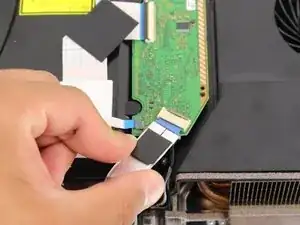
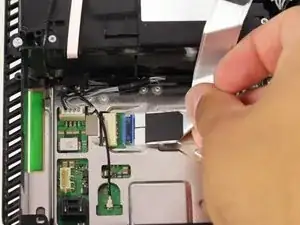
    • Trenne den Flachdraht vom optischen Laufwerk, indem du auf den Metallbügel drückst und vorsichtig am Draht ziehst. Dies sollte nicht viel Kraft erfordern.

    • Trenne denselben Flachdraht vom Motherboard. Achte darauf, den Metallbügel zu drücken und den Flachdraht vorsichtig zu lösen.

    If your PS4 eject button doesn’t respond/work and it doesn’t accept discs ( it doesn’t beep or nothing happens when you touch the eject button and it doesn’t make noise when you try to put a disc in and doesn’t take it) it could be because you took the wire ribbon out the optical drive or motherboard the wrong way and did not press down on the metal tab. ( like I did ) the wire ribbon should have these tiny “wings” on both sides and on both ends. Easy and very cheap fix. Ordered a new ribbon wire on amazon for $12!!! Better then buying a new PS4!!!!

    manny730 -

    Any way to get one of those wings out ? One of them broke off as I was pulling the cable out and is stuck.

    Luke Griffiths -

    Attention, pour sortir la nappe de connection du lecteur optique, il faut appuyer sur la lame métallique du connecteur avant de tirer sur la nappe, c’est un verrou.

    LOPAT -

    Just to emphasize, these are called ZIF cables, or “zero insertion force".

    Truly, you only need to press on the metal button and pull gently *straight* out. No wiggling. No yanking. There is no click.

    If you're putting it back in, the clip “clicks" into place by popping back up.

    Mr. Porter -

    Anyone knows how to remove the broken piece of ribbon stuck inside the connector?

    Sergio Colman -

  8. 6GghfvK6T2yA6bFX
    • Ziehe das Netzkabel vom Motherboard ab.

    Wo geht das andere Ende vom Kabel hin???

    tuure seeger -

    Wo endet das Kabel. Wo kommt die andere Seite hin. Finde kein Anschluss

    tuure seeger -

  9. DnCI3GZ3SI5crQWi
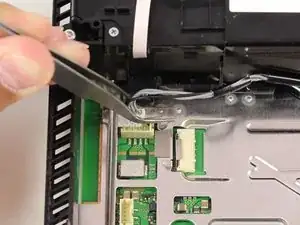
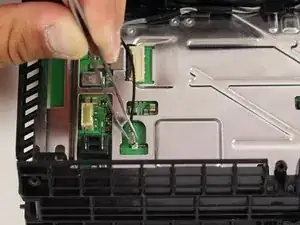
    • Entferne das Wlan-Kabel vom Motherboard.

  10. eRwsqkJnLnJiLN1T
    • Entferne die vier 9 mm Torx Security TR9 Schrauben.

    • Entferne die 5 mm Kreuzschlitz #1 Schraube.

    Mine on the bottom right near the board was a 5mm Phillips #1 instead of the expected 9mm Torx screw. Also, I have a shield plate covering my (or my customer's) board here.

    CPR Matthews, NC -

    Mine is the same

    Jesse King -

    Model Cuh1001a

    Jesse King -

    the guide has missed the optical drive shield. DO NOT PROCEED WITHOUT REMOVING IT. the “optical drive cord “ must be removed from the drive to continue.

    Max R. -

    This guide does not explain how to remove the metal plate on top of this board.

    Nicola Centrone -

  11. cHrbCaoAJTFxAhG3
    • Entferne die Wlan-Antenne.

  12. d5lUsMW4JDUBKKPA
    • Hebe das optische Laufwerk an und entferne es aus dem Gehäuse.

  13. OVFRUrmYbQoZgswO
    • Drehe das Gerät um und entferne die linke obere Platte, indem du es zurückdrückst und anhebst.

  14. wGo5oPEUGS4wSjQa
    • Entferne die beiden 9 mm Torx Security TR9 Schrauben.

    • Entferne die 5 mm Kreuzschlitz #1 Schraube.

  15. 1JnayMvJxA64V1Q5
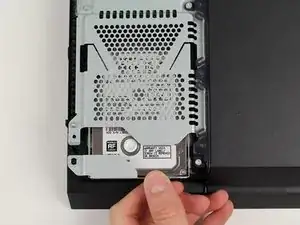
    • Ziehe an der Festplatte und entferne diese aus dem Gehäuse.

  16. JQRvloDTr12PLnos
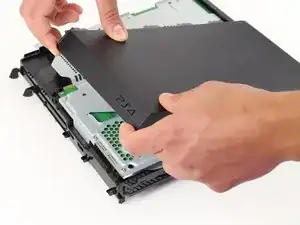
    • Hebe die Vorderseite der oberen Abdeckung an und schiebe sie nach hinten.

    my right corner, by the ps4 logo, was VERY snug, it took me a few minutes to pop that corner off, took a decent amount of force to pop it off

    chris -

    we used the screwdriver to pry it open in the corner

    Sabrina Shahid -

    I try being extremely gentle when working with electronics, but you need a tad more force this. Perhaps you'll need the same force for pulling those miles cables for the optical drive earlier. :)

    Mr. Porter -

  17. EBUQhwZuVjrEwJg1
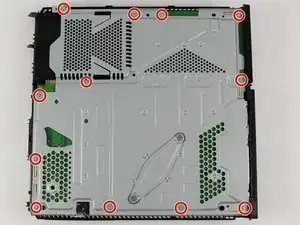
    • Entferne die zwölf 9 mm Torx Security TR9 Schrauben.

    There’s a black Phillips screw next to the power supply connector that needs removed before removing the metal cover.

    louhobby -

  18. mxVfMbkaEf1GWU1S
    mxVfMbkaEf1GWU1S
    YhQbfrYYyEGABawj
    • Entferne die beiden 9 mm Kreuzschlitz #1 Schrauben.

    • Entferne die Metallhalterung.

    Danach muss auf der Innenseite noch eine schwarze Schraube gelöst werden, sonst kann man die Abdeckung und auch nicht Mainboard lösen.

    Maik Heidemann -

  19. iZCMVVFpohy5qf2Z
    • Hebe die Metallabdeckung an und entferne sie.

    On some PS4 consoles there is a small black Phillips head screw under the PSU securing the metal cover to the midframe of the console. If you do not remove this screw you will not be able to remove the metal cover, and run the risk of damaging it, or the motherboard.

    Jordan Troxel -

  20. hDQaYiXgCke3M1pR
    hDQaYiXgCke3M1pR
    5LZbWfygWRQpTFJp
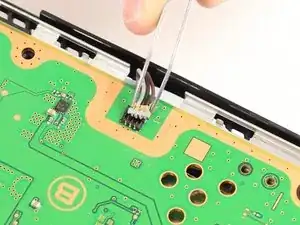
    • Trenne den 3-adrigen Stecker vom Motherboard, indem du ihn vorsichtig nach oben und weg vom Motherboard bewegst.

    What can i do if i broke these three little prongs?

    Josh Turner -

    2 options 1 make a new contact, 2 buy a New fan as it is The fan contact ;)

    Karl eriksson -

    Which kind of connector is this?

    robbitara -

    Hab meine Halterung auch Abgebrochen.

    Das Komplette “ding” ist vom Mainboard/PCB Abgebrochen…

    Was kann man tun?

    Cem Ce -

    Hab meine Halterung auch Abgebrochen.

    Das Komplette “ding” ist vom Mainboard/PCB Abgebrochen…

    Was kann man tun?

    Georgios -

    I accidentally pulled the little red cord out from the white casings. Can I shove it back or do I need a new fan?

    Hobocop -

    Place one side of tweezers under from wire side, pinch with tweezers, and use to lift up, this pulls the wire out of the lock. (They aren't pins inside, but fins.)

    Mr. Porter -

    Having no patience I pulled all 3 fan wires out of connector on motherboard but all wires have there metal connector tips so can I put back into motherboard or did i ruin my fan

    asmar wash -

    Please be EXTREMELY careful, as it is exceedingly easy to break that connector. ☹️

    Except, of course, if you actually plan to replace the fan anyway, well, a new connector comes with the fan, so just look out for the motherboard part of it.

    Wolfgang Bachmann -

    Help!! Si è staccato il connettore dalla scheda madre come lo riattacco????

    Grazie

    Emanuele Lucidi -

    Liebe Gemeinde, leider kann ich die 3 Kabel (braun/schwarz/grau) nicht mehr an das Motherboard anbringen. Ich möchte deswegen den Lüfter an ein externes Netzteil anschließen. Dazu müsste ich wissen für welchenZweck die drei unterschiedlichen Kabel sind,… Masse, Stromzuführung mit wieviel Volt etc.,… schwarz ist…. // braun ist … // grau ist … Bitte schreibt mir auf michel@richterle.de ….. das wäre sehr nett, liebe Grüße

    Michael Richter

    Michael Richter -

  21. dRKkBpjjETBIZYVA
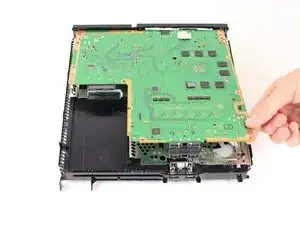
    • Hebe das Motherboard an und entferne es aus dem Gehäuse.

    • Das Entfernen des Motherboards löst die Wärmeleitpaste zwischen dem Prozessor und dem Kühlkörper. Bevor du dein Gerät wieder zusammenbaust, trage neue Wärmeleitpaste auf: Folge dieser Anleitung, um zu erfahren, wie das geht.

    Unfortunately it costs more for the motherboard and optical drive together than it costs for a new PS4 1TB with a game

    Blake Hannan -

    Was passiert wenn man das nicht macht?

    Und was passiert mit der ps4 ohne Wärmeleitpaste ich hab nämlich meine ps4 geöffnet und die Wärmeleitpaste abgewischt und ich habe es zusammen gebaut und die ps4 piept nur 3 mal und geht aus.

    Könnt ihr mir Helfen?

    danke shirin -

    @danke shirin die gleiche hat zu mir passiert. It also happened to me, I did this tutorial and put everything back together, and now it beeps three times red and goes off. I used paste but I guess it is because of sth else

    anonymous 2356 -

    ASLAMULAIKOM sir me Pakistan ho. Mujhy. English. Nahi ati. Mera. PS4 karan hai. Maine. Sab kuch. Khul diya hai plz Mera. PS4 sahi karsaakhty

    Shoaib Mirza -

  22. HkHsNoEw5ZH2fPhM
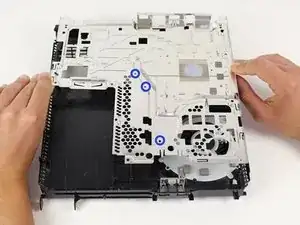
    • Entferne drei 5 mm PH1 Schrauben.

    • Ziehe den Metallträger senkrecht nach oben und entferne ihn.

    You took away all 3 screws…

    How can the left srew suddenly been there already?

    Slipt under the metal-bar, or or screwhole to big… :D

    Beranu Straitjacket -

  23. YkE3uJSiLwhJu2Ql
    YkE3uJSiLwhJu2Ql
    wDiYQBx36hreoQr6
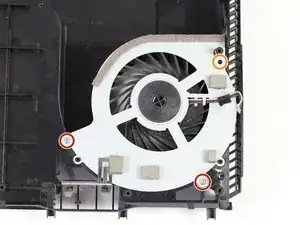
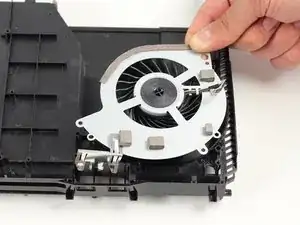
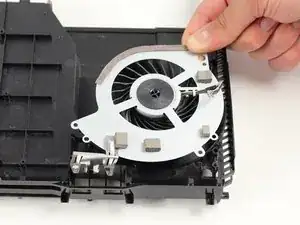
    • Der Lüfter ist jetzt freigelegt, entferne die beiden 9 mm Kreuzschlitz #1 Schrauben.

    • Wenn deine PS4 eine dritte Schraube oben rechts hat, entferne diese ebenfalls.

    • Entferne den Lüfter aus dem Gehäuse, um ihn auszutauschen.

    The guide here is wrong, the left screw holding the fan down is also the bottom-most screw holding the step 22 metal cover down. The only screws that should be on the fan at Step 23 should be the lower right screw and upper right screw

    Haybale100 -

    Yep, I found the same thing.

    anonymous 1428 -

    Me to. but everything else is good

    Adel Mahdi -

    Finally got all the way down to this mother effer! :D

    Mike Harrell -

    My PS4 sounds like a jet engine when I’m playing UFC 3. The airflow at the back of the console feels very minimal. Pretty sure I’m going to have to go through this process at some point soon. All I need is a TR9 Torx driver, some Arctic Silver and compressed air and I’m good to go. Hopefully it’s a simple process. I’ll be suing this guide once that time comes.

    the00brotherhood -

    My ps4 model is CUH-1116A

    i want just know if the fan work with my model?

    i_Abdo_BR -

    Which are the “Philips head #1" screws?

    Jorin Gedamke -

Abschluss

Arbeite die Schritte in umgekehrter Reihenfolge ab, um dein Gerät wieder zusammenzubauen.

Sam Omiotek

Mitglied seit: 25/02/19

41564 Reputation

35 Kommentare

Great guide, but where to buy a fan for the ps4?!

frankeinarhaugen -

Look one ebay, that's where my store gets the majority of out parts from. considering we fix computers.

jonathon saygidia -

Will this guide work with the CUH-1200 model?

Jose Alvizo -

excellent camarade !

Beaux travail !

Attention au principe de peter... Niveaux d'incom.......

je déconne !

P.S. Ne pas se ronger les ongles ca evite les pinces a épiler !

je déconne pas !

Inversement ce pas très esthétique...

Change rien !

Dall -

My PS4 has been overheating so I decided to take it apart and clean it. I cleaned it well but it still over heats the fan will try to start up but cuts back off plz help

Tristen hudson -

Replace the fan ... Yours works intermittently that probably means ut has a bad bearing.

chrisforfacebook1987 -

Does the Model work for the CUH-1116A ????

ITS HD -

Does the fan recommended work for the Model CUH-1116A if not do you know where you can recommend me to get one that's compatiable for it thank you.

ITS HD -

Well, after replacing the fan, triple checking every thing and plugging it back in…. I got nothing. No power at all.

took it all apart three times to make sure all cables, connections and touch sensors were making contact. Still nothing.

With the bad fan in it at least still powered on befor this.

Many help appreciated !

TomJ -

Did you find a solution

tchageman -

Did you find a solution? I’m currently having the same issue!

ketaamarie17 -

This was a great guide! I successfully completed the repair today. Thanks for the comprehensive steps and accompanying photos.

Dylan -

Thank you very much for this repair instructions. I do have one question. At the top of metal plate of the fan are none of the four (I guess) cooling pads shown on the pictures. With which material can I replace them (thickness?)? Thank you in advance.

Marinho -

My power button doesn’t work, but the eject works and the console seems to be running fine when I turn it on with my controller. Any ideas on what I did wrong?

Megan -

I followed the guide with no issues, but when I hooked my ps4 up again and pressed the power button, the console beeped, I got the blue light, but then it turned off. No fan, no screen, nothing.

The power button works, and there is power - otherwise I wouldn’t get a beep.

So I took it apart and reinstalled the old noisy fan. When I put it back together, same result.

Anyone have any ideas what the problem could be?

Derek -

Nice man. Very very so good your guide.

leo.woiciechoski -

Did this repair, fan is better but now my PS4 cuh-1116a won’t read any game discs?! It did beforehand but I did notice there is a bracket on the top of my optical drive? Is it in the wrong way? Could a wire being loose cause this and if so which one? Any help is appreciated thanks.

Charis Smith -

After I replaced the fan and thermal paste and reassembled my ps4, I have NO POWER at all. I have disassembled and reassembled countless times to make sure I didn’t miss something. All wires are correctly placed. Someone please help!

ketaamarie17 -

https://www.easeus.com/resource/how-to-f...

There is also a risk of frying components with static electricity if your were touching all over the motherboard.

Tom Riddle -

Cleaned out the dust and when I put it back together everything worked perfectly, and the stock fan is now silent.

Tom Riddle -

my playstation is now booting in Safe Mode… please help!

Joe Aguirre -

My fan circuit was damaged so i try to power the fan by an external 12V 1.5 amp power supply (your typical adapter 230v-12v)

However when i connect brown wire with +12v and the black one with Minus- , it spins for a couple seconds then stops.

Repeatedly does the same .

So my question is, where is the grey wire for and where do i connect it? Is it a speed regulator? Can i add the grey wire with the plus or the minus?

F.p. -

Great guide. Used it to replace the fan on my PS4 launch edition.

Hernan Trujillo -

I followed this guide step by step, things were going smoothly… after several hours I reach the finish line, I plug it all in get it hooked up, ready to play ,,, bam smoke and sparks come out the back and now its toast. .

jlc1167 -

My PS4 layout does not look like this in step 1? My model is CUH-1215A

Rick Sanchez -

Ps4 turns on but when I load a game the red line appears and it shuts off.

Jarrett Conrey -

Sam rules!!!

Katie Pena -

I replaced the thermal paste and now it's working great. No more overheating red light. Silent as a fish running full throttle. Thank you so much for making this for us!

Jarrett Conrey -

Thank you! Worked like a charm. The worst part was that it died right before the weekend so I had to wait longer to get the new fan. It was actually a pretty fun repair.

Andy Conklin -

why so much things just to get to the fan?

BrysonDowning998697 -

It is because the EMI shield has to be removed to access the fan screws, unfortunately.

Sam Omiotek -

Thank you. Great guide. I used it to disassemble my PS4 to clean it. Works great!

Benedick Miller -

İnanılmaz güzel bir rehber. PS4’ün sesinden eser kalmadı. Teşekkürler…

An amazing guide. Fan noise completely gone. Thanks…

Onur Gülce -