Einleitung
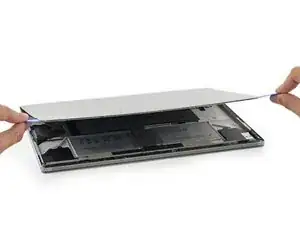
Diese Anleitung zeigt, wie das Display im Surface Book ausgetauscht werden kann.
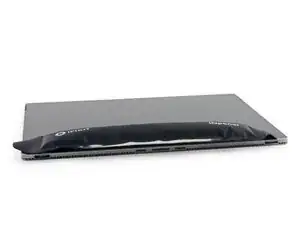
Wenn das Glas bereits gesprungen ist, klebe den gesamten Bildschirm mit Paketband ab, um das Glas zusammen zu halten. Du kannst die Lautsprecheröffnungen als Einstiegspunkt nutzen, und die Rückseite des LCDs für mehr Stabilität beim Hebeln nutzen (da das Glas nur splittern wird, wenn es bereits gerissen ist).
Werkzeuge


Ersatzteile
-
-
Schalte das Surface Book aus und trenne das Display ab.
-
Lege einen erhitzten iOpener auf oder nutze einen Haarfön oder Heißluftgebläse, um den Rand des Displays zu erwärmen. Das weicht den Kleber auf, der das Displayglas festhält.
-
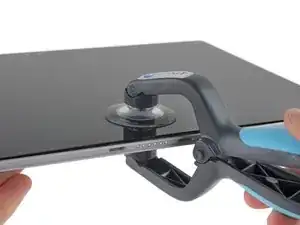
Nutze einen Saugnapf oder iSclack oder ziehe eine Ecke des Displays nach oben, um einen kleinen Spalt zwischen Displayglas und dem Rahmen zu erzeugen.
-
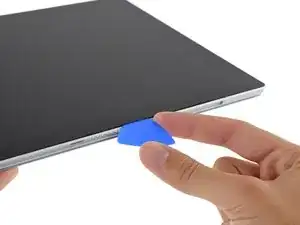
Schiebe ein Plektrum in den Spalt.
-
-
-
Schiebe das Plektrum zum Auftrennen des Klebers um den ganzen Rand des Displays herum.
-
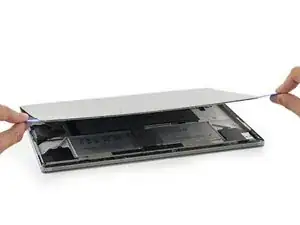
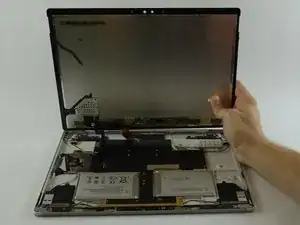
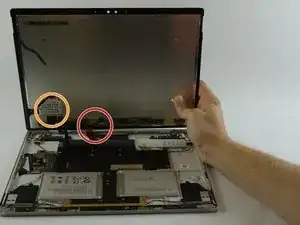
Hebe das Display vorsichtig an, aber entferne es nicht komplett, bevor nicht die Kabel darunter abgetrennt worden sind..
-
-
-
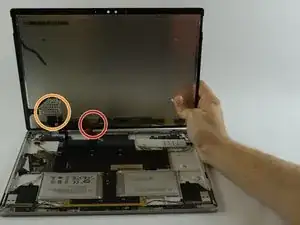
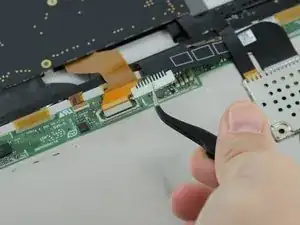
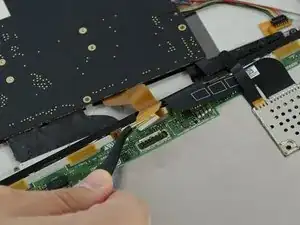
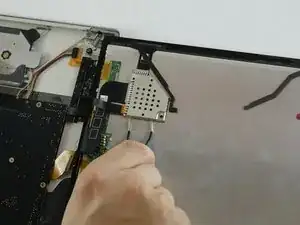
Die Flachbandkabel sind eingekreist. Entferne zuerst das Flachbandkabel rechts (rot eingekreist). Mit der gebogenen Pinzette entferne vorsichtig die Metallklammer, um das Ende des Flachbandkabels freizulegen. Entferne das Flachbandkabel.
-
-
-
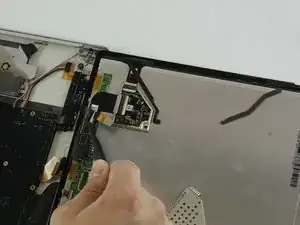
Entferne als nächstes die Metallabschirmung, die das andere Flachbandkabel abdeckt. Entferne dann das Flachbandkabel.
-
Entferne das Display.
-
Vergleiche dein Ersatzteil mit dem Originateil - möglicherweise musst du fehlende Bauteile übertragen oder Schutzfolien am Neuteil abziehen, bevor du es einbauen kannst.
Um dein Gerät wieder zusammenzubauen, folge den Schritten dieser Anleitung in umgekehrter Reihenfolge.
Entsorge deinen Elektromüll fachgerecht.
Lief die Reparatur nicht wie geplant? In unserem Forum findest du Hilfe bei der Fehlersuche.

27 Kommentare
It is very unlikely you will get this screen off without breaking it. Luckily, my customer only wanted the SSD out of the device so he didn't care if I damaged it. This screen is crazy fragile and the glue is very very strong. Do not do this job thinking you will likely not break the screen, unless you have done it before.
The only way to remove it without breaking it is to use good scotch tape and completely cover the screen with a minimum 4 layers of tape. This will keep the screen intact - but you still have to be very careful.
That’s definitely not the only way. I just did it with a guitar pick and heat pad. After doing a ton of Surface Pro 3’s, I think this one is actually pretty easy in comparison.
austin -
I needed 3 hours for this, Did this the first time. There is everything glued. and real hard to not break the screen.
Once you insert an opening pick, you can use a few drops of Acetone around the edge to loosen the glue. I found this much easier than keep reheating the iOpener and possibly cracked the display.
dan89fernando -
Bad idea to use acetone with these types of devices because of the plastic parts that can become either damaged or outright melted by the solvent. (Especially the ribbon cables and connections) You are better off using isopropyl alcohol or nothing. Easy enough just to avoid this idea completely. Not to mention that it is possible to cause the display to shatter due to thermal shock when you apply the solvent to a heated surface. Good luck to those that try anyway.
Rick Sanchez -
The iOpener did nothing to loosen up the glue. Had to use a hair dryer for almost 40 minutes to get it softened up enough to open.
david alexis -
Took at least 30 mins with a hair dryer to get the screen off. That 20 min completion time is total BS.
Tommy -
my screen is 25% off
Daniel R Patton -
Be EXTRA careful when running the opening pick around the bottom right portion of the screen. This is where the touch controller attaches to the display, and the ribbon cable is only about a quarter inch away from the edge and is easy to rip out.
Alexander V Trofimuk -
Very important hint!
Andreas -
Having recently been inside a Surface Book I purchased via Facebook marketplace, consider the screen a “cost” of replacing the battery and the pressure is off of you. I tried VERY hard not to break the glass, but…still happened. With that out of the way, I successfully replaced the screen, battery, and also battery in the base. Microsoft should be ashamed of this device. All that engineering effort built into their crappy hinge, only to have the batteries fail prematurely. Also, the mechanism to release the screen from the base sucks real bad. Mine doesn’t work, I carry a paper clip with me to unleash the tablet mode. Pathetic. Thank GOD I picked this up second hand for a few hundred bucks. Pity the folks that paid two grand or more for this turd.
Ken Okpych -
I just tried for over an hour and a half with heat packs and a dyson hair dryer, and got absolutely nowhere… I even bought the iSclack and had ifixit openers at the ready. I guess I’ll try a heat gun next (after I buy one). If anyone has any other suggestions, it would really be appreciated… I’m so disappointed in Microsoft right now.
Trevor Brown -
If you use a heat gun make sure to keep it moving along the edge and use your hand to shield the rest of the screen from getting hit with heat. You only want it to be hot to the touch and no further. You take a big risk of discoloring the screen if you overheat a part. Heat gun did make life much easier but you have to be very very careful and concentrated while using it.
andrew.j.nieto -
I got my computer open after completely abandoning the “step 1” instructions here. The hot pack (iOPener) and suction cups (iSclack) were completely worthless for me, and did absolutely nothing. Instead, simply get yourself a tool with a very thin metal knife, such as the “Jimmy” sold here on iFixit.
Use a heat gun to get a section of the screen nice and hot (I went with ~160 degrees Fahrenheit) then insert the Jimmy vertically in between the screen and the metal frame (a tiny gap.) Then, carefully flip it horizontally to get between the tape and the screen. After this, carefully slide the knife along the edge while using a heat gun to hover right over the place the knife will next be (I used gloves to prevent burning my hands.) Do NOT insert the knife more than a half an inch into the gap, or you might damage your screen (stay within the black bezel range.)
This will QUICKLY, EASILY, and SAFELY get the screen off.
Trevor Brown -
Attempted to do this without enough heat and the glass shattered; recommend using a heat gun and potentially using repair tape to keep the glass intact. The screen removal is the hardest part of everything.
J.K. -
I broke my screen too, but I blame myself for being impatient. Once I took my time heating with a hair dryer and getting the opening pick in there, with enough heat I could just slide the pick down the edges. Next time I’ll know better!
Kirk Feindel -
I tried the heated iOpener. I had some success but then used too much force and cracked the screen. My advice is to take you time and use the iOpener often on the very edge of the screen. Use the suction cups or iSclack as your primary tools to separate the glass form the frame. And a second set of hands is very helpful to hold the metal part of the screen onto your table. The glass will come off with patience and perseverance.
standurlacher -
Use heat, be patience don’t rush, go slow to prevent breaking screen like I did. I also damage the antenna to the wireless onboard adapter. The antenna is glued between the screen and the enclosure and is easy to damage. I didn’t realize this until after the repair was complete and my surface book no longer recognized its WiFi device. I have to use a usb/Bluetooth adapter. Good luck.
Nyaniso Rahotep -