Einleitung

Der Austausch der Festplatte ist einfach, es muss nur eine Schraube gelöst werden.

  1. qPsGdXwUZZBT6RJa
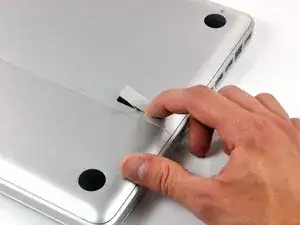
    • Lege die Oberseite des Gehäuses mit geschlossener Klappe auf eine glatte Oberfläche.

    • Drücke den Verschlusshebel auf der geriffelten Seite der Klappe in das Gehäuse des MacBooks, bis du den Verschlusshebel auf der anderen Seite greifen kannst.

    • Öffne den Verschlusshebel so weit, dass er senkrecht steht.

    This is not a a1278 unibody MacBook Pro. A1278 MacBooks backs are one solid metal piece not two separate pieces. This guide is for a different MacBook Pro.

    Brad Burgeson -

    This guide isn’t for a pro; it’s a MacBook unibody.

    Nicholas -

    So, it turns out that Apple used the model code A1278 for quite a few different Mac models, including both Pro and non-Pro versions! This guide is for the non-Pro Macbooks. There’s also one for the Pro models with the same A1278 identifier.

    tempelmann -

  2. Pf4wGUpXWyJ3tAfH
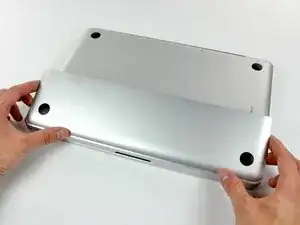
    • Die Bodenklappe sollte nun ein kleines Stück offen stehen.

    • Die Klappe kann nun nach oben aus dem Gehäuse des MacBooks genommen werden.

  3. WkwQip2DfR1iJLMX
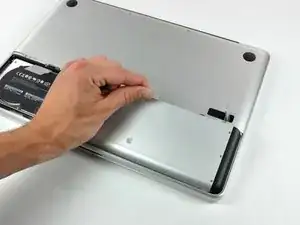
    • Versichere dich, dass sich die Entriegelung der Klappe in senkrechter Position befindet, bevor du weitermachst.

    • Ziehe an der weißen Plastiklasche und damit den Akku gerade nach oben und aus dem Laptop.

    Great tutorial ! great step !

    Leo Etcheverry -

    Even though it’s specifically stated, you have to make sure the access door latch is vertical or the battery won’t be removable.

    Henry Kim -

  4. iOkdv1JNl1NiJQqp
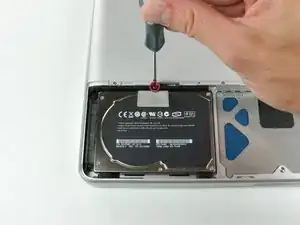
    • Löse die einzelne Kreuzschlitzschraube, die die Halteschiene der Festplatte mit dem oberen Gehäuse des MacBooks verbindet.

    • Die Schraube ist unverlierbar und verbleibt in der Halteschiene.

    My Phillips #00 screwdriver does not fit here. In fact, I´ve tried every Phillips screwdriver I have. Nothing fits. I am losing my mind trying to get that screw out.

    Glenn Gukild -

    Turns out I have a stripped screw...

    Glenn Gukild -

    My drive screw head was pre-stripped. I had to drill through it to remove the drive bracket. Any idea what the specification of this screw is? It appears to be around 12mm long and 1.5mm diameter but M1.5 does not appear to exist.

    tim -

    Here my screw head is worn out. Thinking of drilling it myself as well. Not happy ☹️ Any tips to the rescue to solve this without drilling?

    Robin Harleman -

  5. YOBccGSPpCWHBK4S
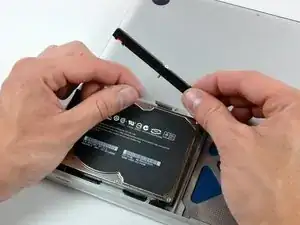
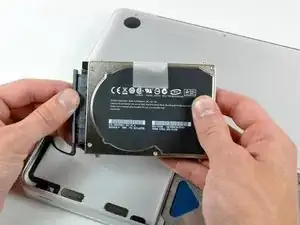
    • Hebe die Festplatte mit Hilfe der Lasche so weit an, dass du die Halteschiene greifen und entfernen kannst.

    • Hebe die Festplatte vorsichtig aus dem Gehäuse, achte besonders auf das Kabel, das sie mit dem Computer verbindet.

  6. vjtxNTlAGWwbhYaN
    • Entferne die Festplatte von ihrem Kabel, indem du den Kabelverbinder gerade von der Festplatte abziehst.

    • Übrig bleibt die Festplatte.

    Is this SATA 1, 2 or 3? I'm buying a SSD and am wondering if it would take advantage of Sata 3.

    Eugene -

    I'm also considering an SSD, any help with this question?

    bryanlatchford -

    I did some some looking around for specs at everymac.com and I came up with this.

    http://www.everymac.com/systems/apple/ma...

    From the link there it says the SATA interface is 3Gb/s, which would be SATA II.

    As for whether or not an SSD is worth it on SATA II, I found a Tom's Hardware article which explains the problem a little bit more.

    http://www.tomshardware.com/reviews/ssd-...

    Hope this helps!

    Chris Opperwall -

Abschluss

Folge dieser Anleitung in umgekehrter Reihenfolge, um dein Gerät wieder zusammen zu bauen.

Andrew Bookholt

569578 Reputation

0 Kommentare