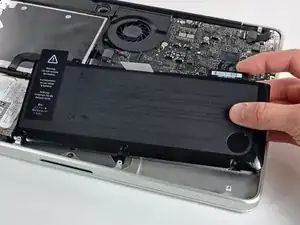
Einleitung
Benutze diese Anleitung, um einen alten oder defekten Akku in deinem MacBook Pro auszutauschen. Wenn dein Akku aufgebläht ist, dann musst du entsprechende Vorsichtsmaßnahmen treffen.


-
-
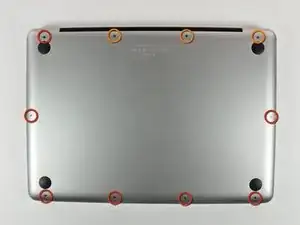
Entferne die folgenden 10 Kreuzschlitz-Schrauben, die die Gehäuse-Unterseite des MacBook Pro 13" Unibody befestigen:
-
Sieben 3 mm Schrauben.
-
Drei 13,5 mm Schrauben.
-
-
-
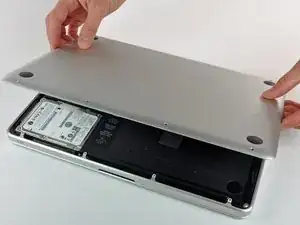
Hebe die Unterseite vorsichtig an und drücke sie Richtung Rückseite des Laptops, um die Halterungsclips zu lösen.
-
-
-
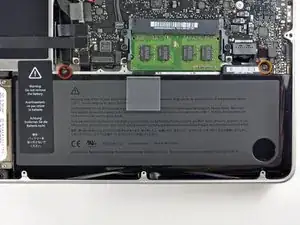
Entferne die folgenden zwei Tri-Point Schrauben, die den Akku an der Gehäuse-Oberseite befestigen:
-
Eine 5,5 mm Tri-Point Schraube.
-
Eine 13,5 mm Tri-Point Schraube.
-
-
-
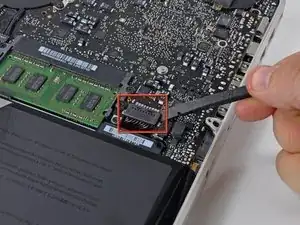
Löse mit der Kante eines Spudgers den Akkuanschluss nach oben, weg vom Sockel auf dem Logic Board.
-
-
-
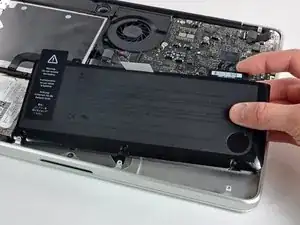
Hebe den Akku aus der Gehäuse-Oberseite.
-
Lade ihn auf 100% und lasse ihn mindestens zwei weitere Stunden am Ladegerät. Ziehe den Stecker und benutze dein MacBook normal, um den Akku zu entladen. Wenn die Ladeanzeige am Minimum ist, dann speichere ab und lasse den Laptop an, bis er von selbst ausgeht. Warte wenigstens 5 Stunden und lade dann ohne Unterbrechung auf 100% auf.
-
Wenn dir nach dem Einbau deines neuen Akkus etwas Ungewöhnliches auffällt oder Probleme auftreten, kann es sein, dass du den SMC deines MacBooks zurücksetzen musst.
-
Arbeite die Schritte in umgekehrter Reihenfolge ab, um dein Gerät wieder zusammenzubauen.

47 Kommentare
My laptop wouldn't believe the battery was new until I reset the SMC as well ( http://support.apple.com/kb/HT3964 ).
Perfect! I didn't want to wait for the Tri-wing screwdriver to ship, so I gave it a try by wedging a FH 1 in between two of the wings. It worked well to unscrew, but you must be very careful when resetting the screws that hold the battery. If you get them started with your finger (a little pressure with your thumb pushing straight down will get the job done) then you can do a few final turns with the FH 1. If you try to start resetting the screws with the off-center-FH1-workaround, you will strip the screw! Keep the screws centered and don't force anything.
worked like a charm. my old battery had bulged and made it so that the track pad would not click :-( replacing the battery did the trick.
statprof -
Compare the short screws carefully before reinstalling them. The shouldered screws go in the holes on the front edge.
David Kilbridge -
Before I started removing any screws I took a piece of paper and drew the bottom of the laptop and put a piece of double-sided tape in the spot where each screw goes. That way when I took out the screws, I could put them on the tape so I knew exactly which screw went in which spot. I did the same thing for dismantling the inside on another sheet of paper, then a third sheet for the screen after getting the front glass off.
mastover -
I use a similar technique: I print out the iFixit manual for the job, and Scotch-tape down the screws/brackets/cables I remove at each step next to the component descriptions. That way, when I'm reassembling, the bits are taped right next to the photo of where they came from.
adlerpe -
That's exactly what I do for all my repairs! It's the best way to keep track of all of the parts ' original location and to make sure that you don't miss any parts during reassembly.
joyitsjennie -
Great idea and one I use often
Thomas Overstreet -
Excellent idea! Thanks for sharing it here.
Laura Sharkey -
I used a 00 that fit but the screws were very tight so I used a tiny paintbrush with some wd40 on it and put it around the edges of the screws. Worked like a charm
valentinedhdh -