Einleitung

Hier wird der Austausch der AirPort/Bluetooth Karte gezeigt.

  1. ZK52UttcjBKbEiPT
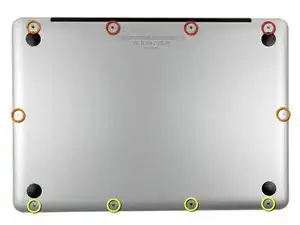
    • Entferne die folgenden zehn Schrauben:

    • Drei 14,4 mm Kreuzschlitz #00 Schrauben

    • Drei 3,5 mm Kreuzschlitz #00 Schrauben

    • Vier 3,5 mm Kreuzschlitz #00 Ansatzschrauben

    • Wenn du die kleinen Schrauben wieder einsetzt, neige sie ein wenig, wie auch das Gehäuse geneigt ist (sie gehen nicht gerade hinein).

    How much weight can I save by removing the optical drive?

    gunes314 -

    You can save a lot of weight if lets say your installing a solid state drive or putting in a second hard drive but if you know that you use the CD/DVD disc drive a lot then you might just want to leave the drive alone.

    Marshall WahlstromHelgren -

    Tip: Use one of those weekday pill holders to have a cheep way to store screws you remove and each day of the week can be for different sizes or parts. It has been handy to have (much less expensive than the magnetic mat.

    Robert Wacker -

    Hello, where can I buy the screws I need in case I lose one of them?

    taylornya -

    I have one stripped screw... How opening without drill it?! Any suggestions please?

    rodrigosady -

    I also stripped a couple screws. I wasn’t able to open it up without drilling. After drilling the heads and removing the cover it was easy to hacksaw the tip and unscrew with a standard driver.

    Michael Wilkens -

    My top tip - make sure you buy good quality Phillips screwdrivers and a magnetic holder. Cheap screwdrivers won’t get the screws undone safely. Without a magnetic holder you have no chance of getting the tiny crews in and out safely.

    jeremyyoung -

    A good Phillips 00 is your friend here. Also, when reinserting the screws, gently start anticlockwise and you wil feel a click at the start of the thread. This tells you you’re in the right place and less likely to cross-thread through force in the wrong place.

    Iain Boyd -

    I feel like these are 000 screws. Amazon sales describe them as such and my 000 screwdriver fits better

    cam2000deluxe -

    Before ordering a new Trackpad remove the existing battery and try clicking the Trackpad. If it clicks OK with the battery out the source of problem is likely a swollen battery, which should to be replaced even if it still works to some degree. From the side of the battery you will likely see the soft part of the battery bulging beyond the hard case.

    Patrick Langvardt -

    That’s absolutely correct as I can testify. With the battery removed I also adjusted the T6 set screw that adjusts the sensitivity of the trackpad click, evidently someone had cranked mine down tighter than the factory setting.

    Gary Register -

    Le quatrième paragraphe dans les instructions en français n’est pas correct : ce ne sont pas les 2 petites vis, mais les 7 petites vis qui sont inclinées. Et les 3 grandes sont bien verticales.

    Degeorges -

    Bonjour ! Merci de votre observation. J’ai corrigé la traduction. iFixit étant un wiki, n’hésitez pas à modifiez si vous remarquez une erreur :) Encore merci de votre attention et à bientôt !

    Claire Miesch -

    Tip: if you have a magnetic screw mat or similar, lay the macbook over the mat to make sure it catches any screws that may decide to fall of and hide under your table

    Moritz -

  2. vYHwhaRFGeCR2lAZ
    vYHwhaRFGeCR2lAZ
    RVKjhXW1CYSUnZk3
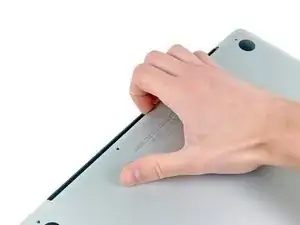
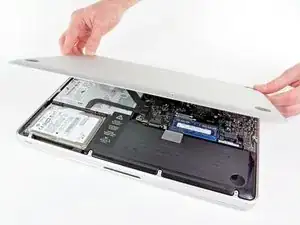
    • Löse mit den Fingern in der Nähe vom Ventilator die Gehäuse-Unterseite vom Hauptteil des Gehäuses.

    • Entferne die Gehäuse-Unterseite.

  3. Eyo2p2BYesPQBNEc
    Eyo2p2BYesPQBNEc
    BFghqfctKoeQMJon
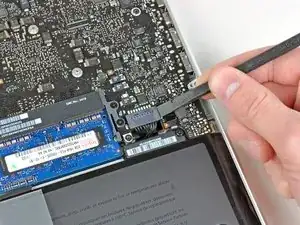
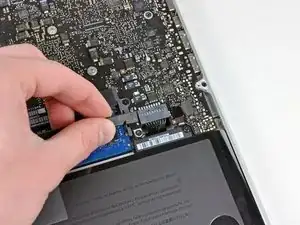
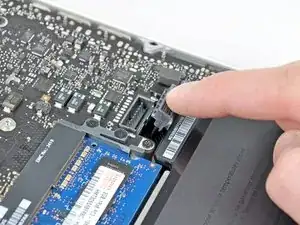
    • Löse mit der Kante eines Spudgers den Akkuanschluss nach oben, weg vom Sockel auf dem Logic Board.

    • Es ist hilfreich, beide kurzen Seiten des Anschlusses gleichzeitig nach oben zu hebeln. Sei vorsichtig mit den Ecken des Anschlusses, da diese sehr leicht abbrechen können.

    Is this step of removing the battery connector required?

    manodh -

    yes - as with disassembly of any electronic component you have to remove any power source. You don't want to accidentally turn the Mac on

    khull -

    Prying the battery connector off does not take much force. I did exactly what the guide suggested (walked it off back and forth) with the spudger without any problems. Just be very gentle, much like with anything inside laptops, they are very fragile and need to be worked with carefully. A+ instructions, battery replacement was a success.

    aekinaka -

    Be patient on disconnecting this one. It worked for me step by step, little by little.

    Phil Wagner -

    I used the nails of thumb and pointer finger simultaneously - worked pretty fine

    Reinhard Kaune -

  4. CACTEGtNtEikmgfJ
    • Biege das Akkukabel vorsichtig weg vom Sockel des Logic Boards, damit es sich nicht aus Versehen beim Arbeiten wieder verbindet.

    I put some tape between the connector and socket while working on the drive.

    Stephen Smith -

    That's a good tip

    Anrothan -

    Great tip, I did that too

    Ahmed Mahran -

    One other note: The screw heads fit flush with the curvature of the case -- which means that they aren't exactly horizontal. In other words, they aren't perpendicular to the table that the computer is resting on. Don't try to force them straight in vertically, because you'll risk cross-threading them. (nearly ruined one screw hole myself!)

    lelandjordon -

    On my MacBook Pro, the connector seems to be an integral part of the battery.

    Jerry South -

    I suspect it’s just like the special screwdriver required for seatbelts on cars – to discourage regular consumers from attempting repairs. Of course, this only encourages consumers to use the wrong tool to attempt to repairs

    colleenthompson -

  5. qPO5RcoxsNqVhWVs
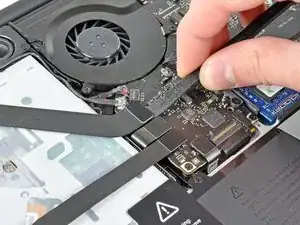
    • Hebe den Verbinder zum Airport/Bluetooth Kabel mit dem flachen Ende des Spudgers aus seinem Sockel auf dem Logic Board.

    N.B! Thank you very much all you here on iFixit! Some IMPORTANT notes. Be very careful BEFORE prying the connectors up and down. They are very fragile and the picture could actually be seen as showing a bending loading in their weakest direction, AROUND its slender axis. The connector is slender and inserted on the logic board, so the gentle "walking" up and down should be done ALONG their slender direction and WITHOUT touching the adjacent connectors. If bending is done around its axis the soldering comes apart and the cable is done and gone. Just happened. These flat cables are one of the weakest design spots in my experience. They are a major time, money and geist consuming reason for malfunction like Wi-Fi connection problems, HDD, SSD not found internally but externally from USB issues et al being found on different forums. Thanks again and again.

    Greg -

  6. RNSAPGwXHEELwDLt
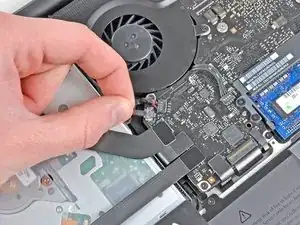
    • Ziehe vorsichtig das Kamerakabel aus seinem Sockel auf dem Logic Board.

    • Ziehe das Kabel parallel zur Oberfläche des Logic Boards. Wenn du es nach oben ziehst, kannst du das Logic Board oder das Kabel selbst beschädigen.

    Be extremely careful on step 6 with late 2011 model unibody macbooks! The cable is connected very tightly to the board and has a great chance of ripping if you just pull the cable.

    Tim Rauls -

    My cable is broken, have the part number or code to buy?

    VÍCTOR RIFFO -

    I found there was plenty of length in the camera cable (as it goes around two sides of the optical drive) so does not need to be disconnected - just ease it out of the slot alongside the drive and lay it diagonally across.

    Nic Blinston -

  7. VItXMA6sxHqcSEsg
    VItXMA6sxHqcSEsg
    YV4ABQFLBHUlRuTb
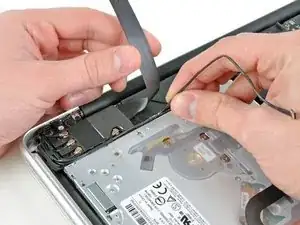
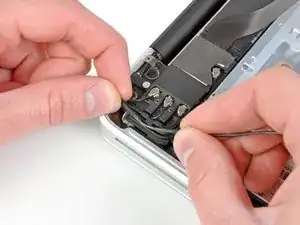
    • Schiebe das Flachbandkabel von Airport/Bluetooth vorsichtig aus dem Weg und löse das Kamerakabel von der Klebeverbindung mit der es am Subwoofer und der Halteklammer angebracht ist.

    • Fädle das Kamerakabel aus dem Bügel in der Halteklammer von AirPort/Bluetooth.

    Take a few phone close-ups of this corner of your system prior to disassembly. Extra photos really help during reassembly.

    airshack -

  8. HV4RogdQOP6KSkS3
    HV4RogdQOP6KSkS3
    aSYfYlBGraP1HcKb
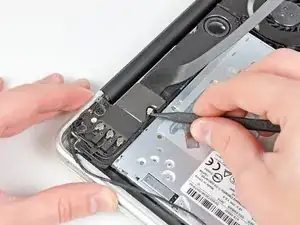
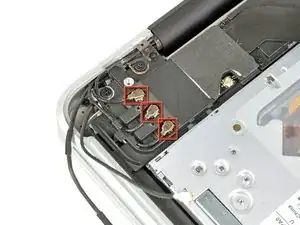
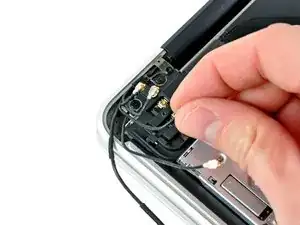
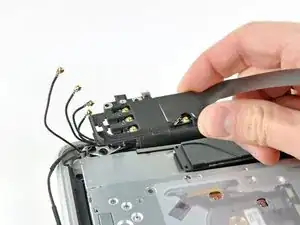
    • Hebele den Antennenverbinder, der am nächsten zum Logic Board ist, aus seinem Sockel auf der Airport/Bluetooth Platine hoch.

    • Fädle das Antennenkabel aus dem Bügel in der Halteklammer von AirPort/Bluetooth.

  9. awGG16FAvgw2LrNv
    awGG16FAvgw2LrNv
    mFSPu12XQjbeemTa
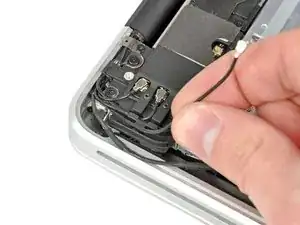
    • Löse mit der eben beschriebenen Methode die restlichen drei Antennenverbinder.

    • Fädle ihre Kabel aus den Ausschnitten in der Halteklammer von AirPort /Bluetooth

    I found re-attaching these antennae connectors the trickiest bit by far as they appear very delicate and seating them correctly was fiddly. In the end lighting them from the side with a small torch helped to check their position before gently pushing them down. The first one made a clicking sound as it connected, the other two went on silently. MBP wifi working perfectly now. I’m fairly sure that was at least £100 of labour had I taken it in for repair so thanks ifixit for saving me money and for the warm glow of accomplishment!

    Andrew -

    Actually, on my repair attempt, one antenna cable broke (on the image the bottom right one in the red square), I’m not sure whether it broke already before or was morbid somehow. Fact is. suddenly I had this cable in my fingers, and was sure I completely broke the macbook and need to find a new display now.

    But as it turned out: the Mac is still fully working, including WIFI, BT, Camera etc. So apart from my huge relief, I want to address that these cables may break easily at their connection with the display. And that one antenna might be not mandatory for WIFI to work.

    huedrant -

  10. DprsKSCNnjnIXE3k
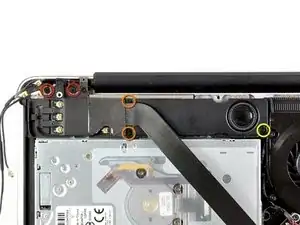
    • Entferne folgende fünf Kreuzschlitzschrauben:

    • Zwei 10,3 mm Schrauben

    • Zwei 3,1 mm Schrauben

    • Eine 5mm Schraube

  11. RmKsQnJUJMvaQVFS
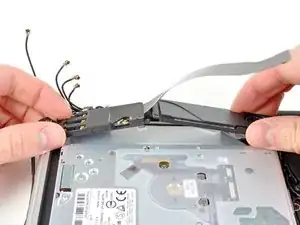
    • Hebe die Airport /Bluetooth-Einheit und den Subwoofer in der Seitenmitte beim optischen Laufwerk hoch bis sie sich voneinander lösen.

  12. xFIRI1aKLCYgeDBr
    • Entferne die AirPort/Bluetooth-Einheit. Achte dabei auf den empfindlichen Antennenkontakt in der Nähe der Gehäuseecke.

  13. 3KWE3Fq5mP5SXDkH
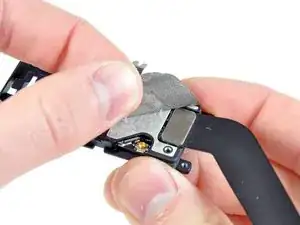
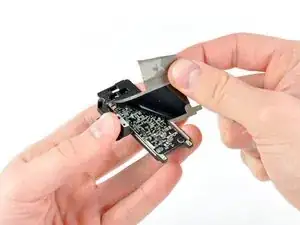
    • Löse das Stück EMI Band ab, welches auf den Stecker des AirPort/Bluetooth Kabels geklebt ist.

  14. VuV1btuAifhxsTSQ
    VuV1btuAifhxsTSQ
    aNQwxBpQbtdCwdJC
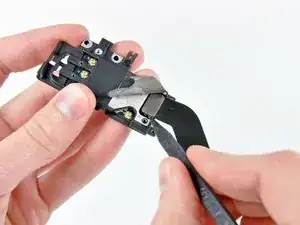
    • Hebe den Stecker am AirPort/Bluetooth Kabel mit der Spudgerspitze aus seinem Sockel auf der AirPort/Bluetooth Karte.

    • Entferne das AirPort/Bluetooth Kabel.

    Hi, any one know the name or the number part of the female connector of the flex cable? (the one on the card)

    Carlo Barrak -

  15. HtbX1gBLGrTBKnru
    • Löse weiterhin das EMI Band von der Unterseite der Halterung der AirPort/Bluetooth Karte ab und entferne es von der Einheit.

  16. ghcsRtXQTDeEnNoV
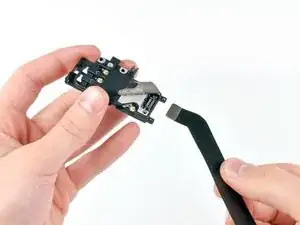
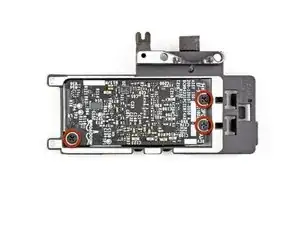
    • Entferne die drei 3 mm Kreuzschlitzschrauben, welche die AirPort/Bluetooth Karte an ihrer Halterung befestigen.

  17. Pc2N4o6qW5nYURxE
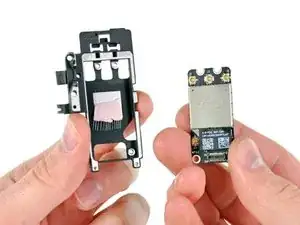
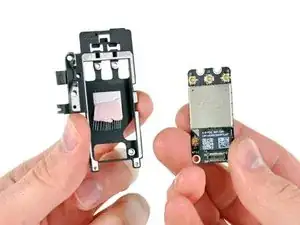
    • Entferne die AirPort/Bluetooth Karte aus ihrer Halterung.

    • Achte darauf, dass du nicht das rosafarbene Thermopad beschädigst, welches auf der Halterung angeklebt ist.

Abschluss

Um dein Gerät wieder zusammenzusetzen, folge den Schritten in umgekehrter Reihenfolge.

Andrew Bookholt

569578 Reputation

5 Kommentare

If you change your bluetooth card, its MAC address will change. Since pairing is done by MAC, you will need to re-pair all devices.

Oliver Humpage -

My Wifi failed, "no hardware found", but the Bluetooth still worked. I replaced the board, but still no dice. Turns out it was the cable. Lesson learned: try the cheaper part first! Not a total loss, now I have Bluetooth 4.

Michael Schwern -

Hello,

I was able to complete this repair in less than 40 minutes, thanks to the author and his easy-to-follow guide!

Regarding Step 10 - I found it easier to use a Phillips #000 screwdriver (instead of the recommended #00 size) for the two “orange” 3.1 mm Phillips screws, as it did not slide off the tiny screw heads like the larger-sized screwdriver would.

Robert Sebastian Soyka -

This is an amazingly succinct and clear at of instructions! My Hat is of to you!

I discovered that the flat wifi cable was not properly plugged in, so I plugged it back in and went no further! Yea it worked!

heartsingingsoul -

I added this note already in step 7, but want to make more visible for those that might encounter a broken cable:

Actually, on my repair attempt, one antenna cable broke (on the image the bottom right one in the red square in #7), I’m not sure whether it broke already before or was morbid somehow. Fact is: suddenly I had this cable in my fingers, and was sure I completely broke the macbook and need to find a new display now.

But as it turned out: the Mac is still fully working, including WIFI, BT, Camera etc. So apart from my huge relief, I want to address that these cables may break easily at their connection with the display. And that one antenna might be not mandatory for WIFI to work.

huedrant -