Einleitung

Nach einer gewissen Zeit wird ein Akku schwächer und kann nicht mehr so lange verwendet werden oder funktioniert gar nicht mehr. Diese Anleitung zeigt, wie du den Akku deines Lenovo IdeaPad 110-15ISK ausbauen kannst.

  1. iaTSuQ65o5eYyMRP
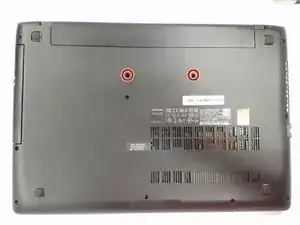
    • Drehe das IdeaPad auf die Oberseite.

    • Entferne auf der Rückseite die beiden 6 mm #1 Kreuzschlitzschrauben, die die Tastatur fixieren.

    • Drehe den Computer wieder um.

  2. MWgAEW1RNUuDyE1A
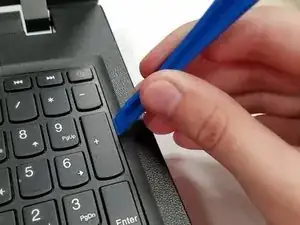
    • Öffne den Computer.

    • Heble die Tastatur mit einem Opening Tool nach oben und weg von der unteren Baugruppe.

    There’s a screw which is fixed behind the laptop which is fixed to keyboard.

    So first remove all screws on the back panel in step 5.

    Suyama Madushan -

    There are actually 2 screws on the bottom of the laptop that secure the keyboard. Removing all screws from the bottom of the laptop is still the best thing to do before beginning.

    Michael Wiseman -

  3. EwNM66JTmlCoEEBO
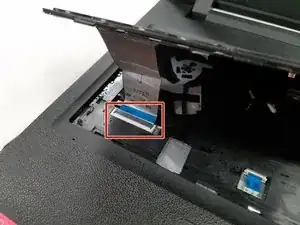
    • Entferne das Tastaturkabel, indem du es mit der Spitze eines Spudgers oder deinem Finger vorsichtig aus dem Anschluss drückst.

    • Entferne die Tastatur vom Gerät.

    Die zwei Schrauben auf der Unterseite müssen vorher gelöst werden. Wer dieser Anleitung folgt, bekommt die Tastatur zwar mit Gewalt raus, hat aber dann sie von der verschraubten Halterung abgerissen.

    schiller -

    Danke! Ich hab’s angepasst!

    Fabian Neidhardt -

  4. FhggFWKAuCRHg6kh
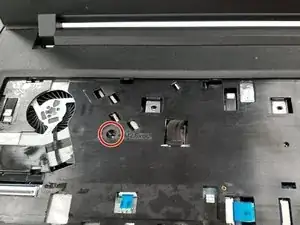
    • Entferne die 5 mm #1 Kreuzschlitzschraube am Gehäuseunterteil.

    This doesn’t disconnect the optical drive, as that’s located on the other side of the laptop. It disconnects the fan assembly.

    Michael Wiseman -

    yes the correct screw to remove for freeing up the optical drive is on the underside of the laptop, not the one shown which is on the wrong side and is under the keyboard?

    David Mallinson -

  5. bdtQTToEFl2rnbkp
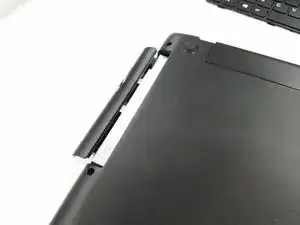
    • Drehe das Laptop um, sodass das optische Laufwerk in der oberen linke Ecke liegt.

    • Ziehe das optische Laufwerk behutsam aus dem Laptop und entferne es.

    When you remove the optical drive, you will find two small screws you need to remove as well, in the lip of the optical drive bay

    Arnold Chavers -

    Before removing the optical drive you will need to remove one of the screws on the bottom of the laptop. Assuming you’ve gotten this far, you probably already did that in order to remove the keyboard. If not, then you should just remove all screws from the bottom of the laptop.

    Michael Wiseman -

    The optical drive screw is actually the 1 screw remaining in the center of the back after removing the keyboard.

    Garret -

  6. qJnJN1jZD4KAdDmS
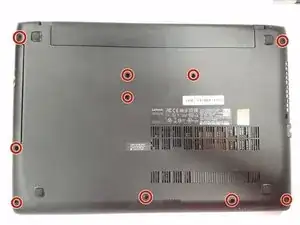
    • Drehe das Laptop um, sodass die Unterseite nach oben zeigt.

    • Entferne die zehn 6 mm #1 Kreuzschlitzschrauben an der Gehäuseunterseite.

    • Drehe den Rechner wieder um, sodass die Vorderseite nach oben zeigt.

    There are actually 11 of these screws (there are 3 on the right side of the picture, not just 2). Also, there are 2 smaller, flatter screws underneath the optical drive on the left that will need to be removed as well.

    Michael Wiseman -

  7. oFjMlZBnAEFEv6pl
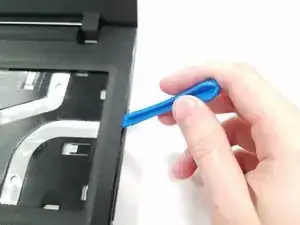
    • Trenne die Gehäuseoberseite mit einem Opening Tool von der Unterseite.

    • Heble die Oberseite von der Gehäuseunterseite ab, indem du dich einmal um das Notebook herum arbeitest.

  8. t4snPoUfEi1fHQFV
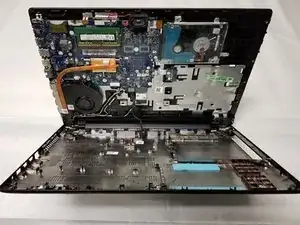
    • Drehe den Laptop um und löse die Gehäuseoberseite vorsichtig von der Gehäuseunterseite ab.

    Don’t forget to actually remove the Battery cable…

    Chad DePugh -

    I have difficulty in separating the connection cable from the battery to the motherboard, in the connector of this. Please, I would need some advice to do it without having any problems. Thanks a lot.

    Omar Quintas -

  9. SKwbxwE3dxw4exSL
    • Der Akku ist an der Gehäuseunterseite befestigt.

    • Entferne die beiden 4 mm Schrauben.

    • Drücke den Akku aus dem Gehäuse, um ihn zu entfernen.

    But what about the covered wire connecting the battery to the board?

    ???

    Roxanne Corbin -

Abschluss

Um dein Gerät wieder zusammenzubauen, folge den Schritten dieser Anleitung in umgekehrter Reihenfolge.

Jakub Szark

Mitglied seit: 17/10/18

513 Reputation

0 Kommentare