Einleitung

Der Austausch des Akkus ist ein einfacher, aber doch auch kritischer Vorgang, wenn man den Gebrauch des Rasierers bedenkt. Viele Leute kaufen gleich einen neuen Apparat, wenn der Akku defekt ist, anstatt ihn einfach auszuwechseln. Das ist eine teuere Angelegenheit, da man ja die Lebensdauer des Gerätes durch den Austausch leicht verlängern kann. Diese Anleitung zeigt, wie du den Akku beliebig oft auswechseln kannst.

  1. vKVN3aKvcC4BWVhI
    vKVN3aKvcC4BWVhI
    ZUCSxQETFlMsqlcc
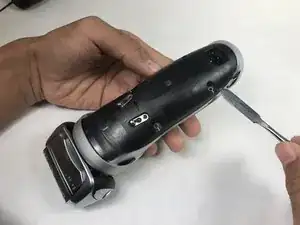
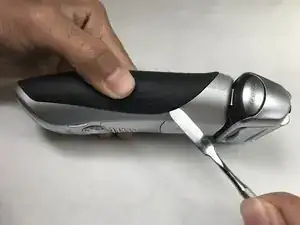
    • Entferne die Gummiauflage auf der Rückseite mit einem Spudger.

  2. MFviKWpjJMhYBRSu
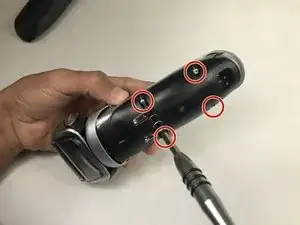
    • Entferne die vier 10 mm langen Torx T8 Gehäuseschrauben.

  3. QxHq4wdqBBQdSLvG
    QxHq4wdqBBQdSLvG
    NB3HwUlrhdTynBUP
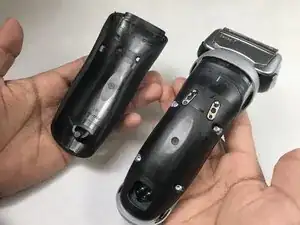
    • Entferne die Rückseite vom Gerät.

  4. lxxopWqlkiYWMLFE
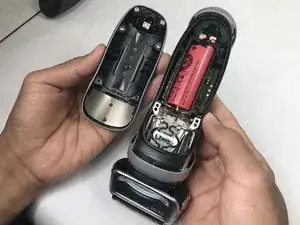
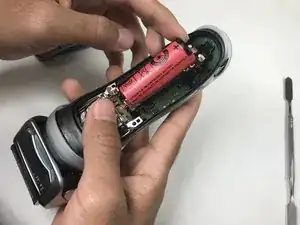
    • Hole den Akku aus seiner Fassung heraus.

  5. JUCDDEDqMOL6Rrqy
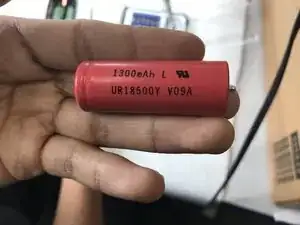
    • Ersetze den Akku durch einen neuen. (Sanyo UR18500Y)

    • Achte darauf, dass der Akku in der richtigen Orientierung eingebaut wird.

    hey namesake thanks for the effort! Is the same true for the 7899cc?

    Alex Morello -

    The shaver was working on electricity before I disassemble it. As I couldn't find a new battery I re-assembled is with the old battery but it does not work anymore on electricity.

    Is there any trick here?

    Sherif Badawi -

    An excellent step by step instructions…??????????

    Peta Smith -

    You saved me £200!

    Thank you 🙏🏼

    A Ghate -

Abschluss

Um dein Gerät wieder zusammenbauen, folge den Schritten in umgekehrter Reihenfolge.
Alex Speer

Mitglied seit: 07/11/17

571 Reputation

21 Kommentare

Where do you buy the Battery?

bruce Forsyth -

Any idea on how to remove/replace the drive unit? I bought a new one but the plastic backing is extremely hard to get off.

Chris -

Thank you for the awesome tutorial Alex!

I just wanted to comment that a small flat-head screw driver can be used to remove the 4 screws (under the rubber handle piece) if you don’t have a Torx tool. The screws each have 1 small slot across the head and if you’re careful you can remove and re-install them without too much trouble.

Thanks again for helping to save me a lot of trouble with this Alex… and avoid having to buy a new electric razor!

-jb-

arcticassault -

How do you reset the battery life indicator on the shaver after replacement?

jclemis -

Under Braun there is a reset button, hold in for 4 seconds

alanshedler -

What are symptoms of dying battery, other than failure to hold a charge? My Series 7 9595 will run perfectly, until I use the pop-up side trimmer. Then it shuts OFF, with the full battery and Hygiene meter dropping to absolute zero. I open it up and pull the battery…. and suddenly battery charge is “restored.” I’m stumped…

piloti951 -

Same question as jclemis

alanshedler -

any guide to replacing braun 9 series battery replacement.

julio -

Thanks for the great information, the reset information is also very helpful. I am going to reset it on a full charge. Very easy to change, much better than the ones that had them soldered in.

valricojoe -

Have followed all above instructions and shaver works well until the back is replaced then stops working. Blue light comes on but shaver does not start? Can anyone explain why?

Brian H

Brian Hammond -

I have the same problem as Brian H does. I replaced the battery and replaced the back cover, the blue light comes on but it doesn’t turn on. If I take the cover off and hold the motor in with 2 screws, the motor turns on so I’m sure all of the components work. Has anyone else have the same problem? Does anyone have a fix for this problem?

Walt L

Walt LaPrade -

I have he same problem as Brian H and Walt L. Came to this site to find the answer. If I find the solution, I’ll come back and post it.

curt centers -

is this a standard 18650 battery?

Mike O -

Thanks for the tutorial.

Idiot as I am - I inserted the battery the wrong way.

And now the shaver is dead.

What can I do?

Best regards

Hans, Denmark

Hans Bundsgaard -

My unit would light up after battery replacement, but motor would not operate. I determined that motor assembly contacts were not touching opposing contacts; cover screws were going through square holes in brackets rather than the round holes. To allow motor assembly to push far enough into main body, I removed shaver cartridge to allow better manipulation. Then I opened trimmer unit. This allowed me to push the motor assembly to its correct location and allowed the upper screws to slip thru the round holes in mounting ears to hold motor assembly at correct depth.

chachin1950 -

Thanks! Unfortunately, the screws on mine are completely corroded… :(

Alexander Ivanchev -

I replaced battery in my Series 7. Would not work. Put the original battery which was still working some back in. Now it won’t charge. The new battery I bought didn’t have the little tips that stick out in the middle of each end. Help!

Andy Norman -

Great, easy to follow tutorial. It feel so much better to start opening stuff when you realize someone else has already done it, and done it successfully without ruin the gadget (which is the whole point in the first place).

ExpatViking -

Same question as Mike O from a year ago: is this battery a standard 18650 rechargeable Li-ion?

Richard George -

Thank you! You saved me the price of a new shaver. The replacement of the battery was extremely easy. Just remember to insert the battery the correct way.

Max Weber -